

Are you the author? Sign in to claim
A floating, screen-aware Claude Code chat for Windows - it reads your screen to answer, and runs on your own Claude subs





Talk to Claude Code without ever leaving the app you're in — and let it actually see your screen.
Windows 10 / 11 only (for now) · runs on your existing Claude subscription — no API key

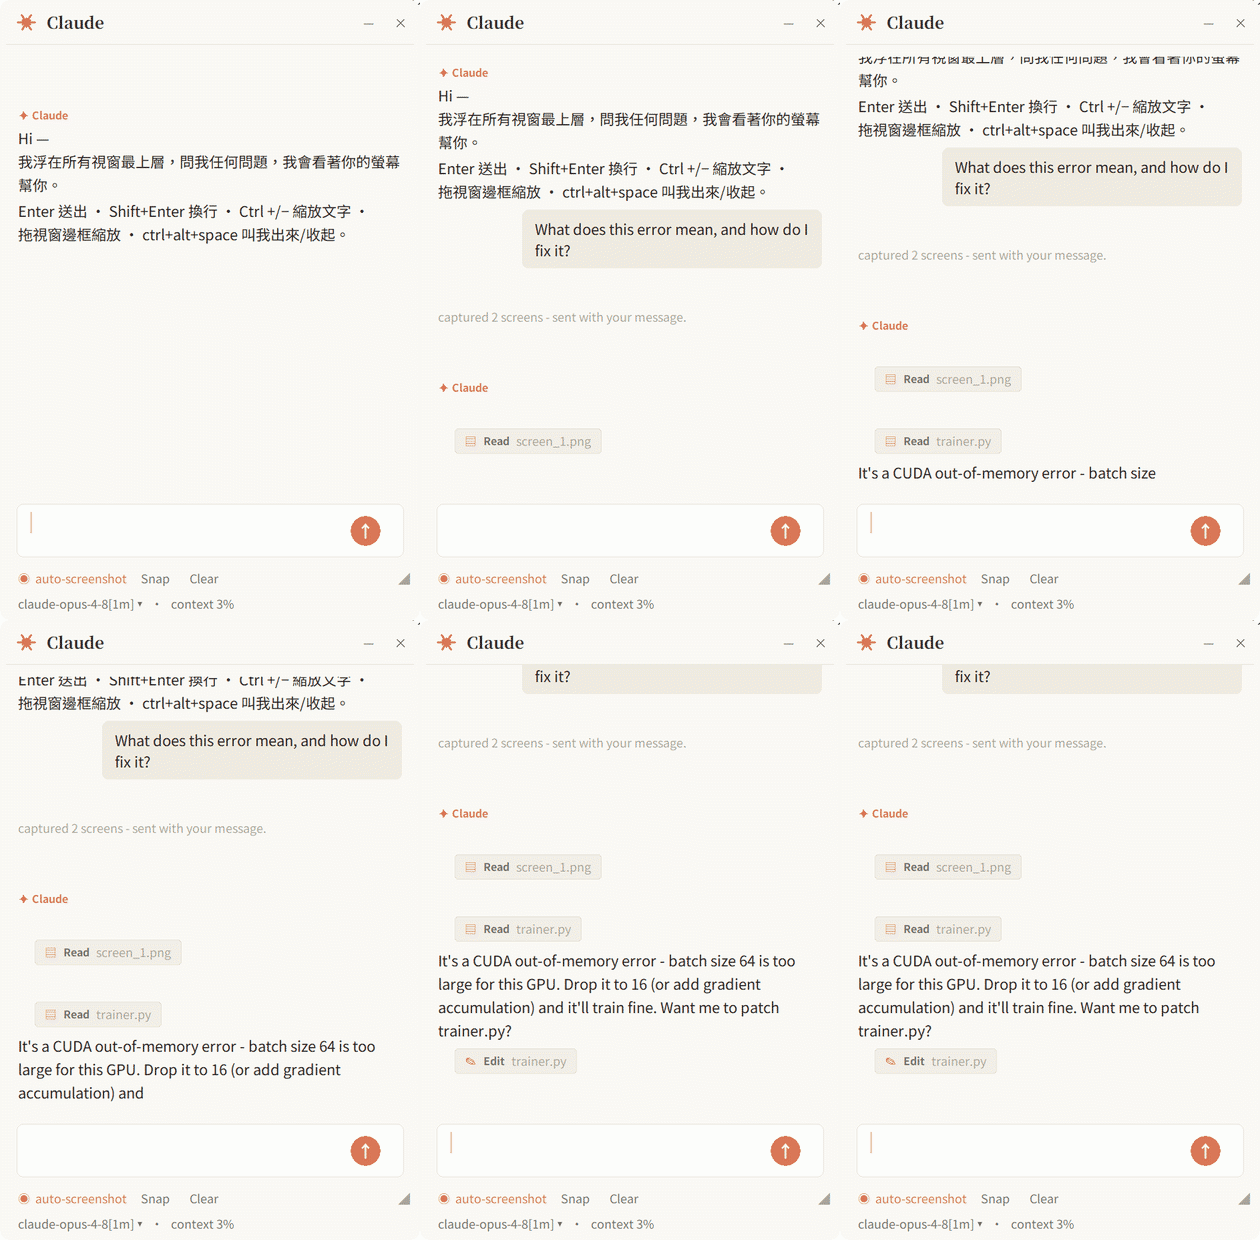
Claude Overlay is a frameless, always-on-top chat window that floats over everything you do. Ask a question, and Claude looks at your real screen — every monitor — to answer. No copy-pasting error messages, no describing what you're staring at, no alt-tabbing to a browser. And because it runs the full Claude Code agent under the hood, it doesn't just chat — it can read, edit, and run things for you, right where you work. Point it at the slide deck, document, or spreadsheet you have open and it can change the file you're looking at — you never have to tell it where the file lives or even alt-tab away.
Best of all, it costs nothing extra: it drives your own claude CLI login,
so it uses your existing Claude subscription — no API key, no metered billing.
⭐ If a screen-aware Claude that floats over your work sounds useful, star the repo — it helps other people find it.
The CLI and the desktop app are perfect when you're already in a terminal or a chat window. The overlay earns its place by floating over whatever you're doing, seeing it, and acting on it — so it shines exactly where those can't:
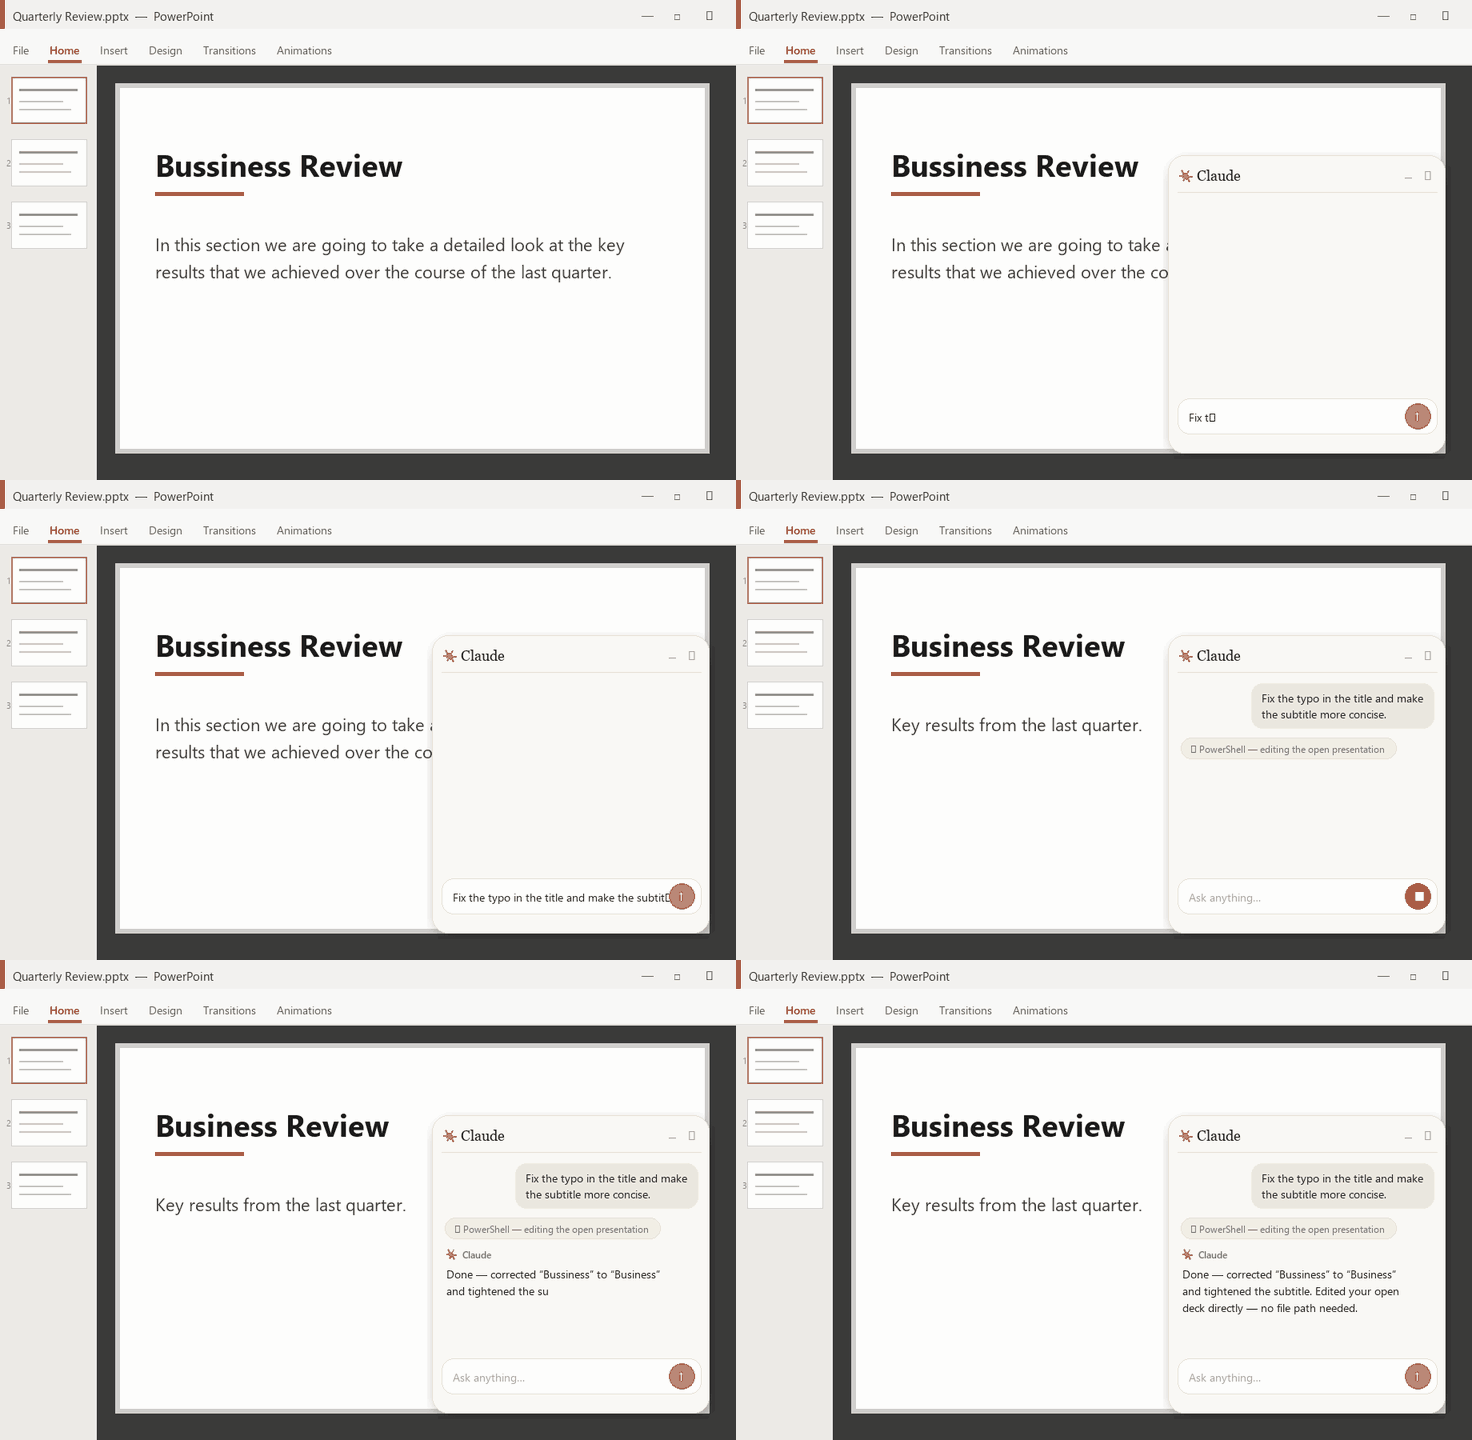
Ask it to fix the open slide — it edits the deck you already have open, no file path given.

Ask in the overlay; it drives Excel to build the model — assumptions, formulas, and a sensitivity.
Not using it? It collapses to an orb that floats out of the way — click to bring it back.
Overlay (Tkinter UI)  →  claude-agent-sdk  →  spawns the `claude` CLI  →  Anthropic
        ▲ screenshots (Pillow ImageGrab, one image per monitor)
claude-agent-sdk spawns your installed claude CLI as a subprocess
and talks to it. It is not a direct API client, so the CLI is required.ImageGrab snapshots each monitor separately; the prompt
labels which is the primary vs secondary screen, and Claude reads each
with its Read tool. The window hides itself during capture.You need three things. The included setup.cmd handles #2 and #3 for you — it
auto-installs the Claude Code CLI if it's missing and installs the Python packages.
The app uses Win32 APIs (DPI awareness, rounded corners, multi-monitor capture), so it currently runs on Windows only.
The overlay has no brain of its own; it drives the claude command line.
Easiest: just run setup.cmd (below) — it installs the CLI for you with the
official native installer if you don't already have it. To install it yourself:
irm https://claude.ai/install.ps1 | iex
winget install Anthropic.ClaudeCode). It auto-updates itself.npm install -g @anthropic-ai/claude-codeLog in with your own Claude account (Pro/Max subscription — no API key needed):
run claude auth login (in PowerShell or CMD — not Git Bash) and follow the browser prompt once.
Verify — this must print a version number:
claude --version
If it says "command not found", the CLI isn't installed / on PATH yet.
Install from https://www.python.org/downloads/ and tick "Add python.exe to PATH" in the installer.
Verify:
python --version
Pick whichever you like — all three end with the overlay ready to run.
setup.cmd (recommended)Get the repo, then double-click setup.cmd. It checks Python,
auto-installs the claude CLI if it's missing (and offers to log you in), and
installs the Python packages — so even a fresh machine is one double-click from ready.
git clone https://github.com/shengyanlin/claude-overlay.git
(or download the ZIP from the green Code button and unzip it.)
It's an agent — so it can set itself up. With the claude CLI already installed
(see Prerequisites), run this from
wherever you want it to live:
claude "Set up Claude Overlay for me: clone https://github.com/shengyanlin/claude-overlay, make sure Python 3.10+ is installed (install it if missing), ensure pip is present (python -m ensurepip --upgrade), then run python -m pip install -r requirements.txt, then launch it with pythonw. Tell me when it's running."
Claude will ask before each step.
git clone https://github.com/shengyanlin/claude-overlay.git
cd claude-overlay
python -m ensurepip --upgrade          # only needed if pip is missing; harmless otherwise
python -m pip install -r requirements.txt
This installs only the Python packages (claude-agent-sdk, pillow, keyboard) —
you still need the claude CLI installed and logged in (see Prerequisites). Use
python -m pip (not a bare pip): it works even when Python's Scripts\ folder
isn't on PATH, and ensurepip bootstraps pip if your Python install shipped without it.
The overlay shows its version in the bottom status line (e.g. v1.7.2) and checks
GitHub for a newer release on startup — when one exists you'll see a 🔔 note and a ⬆
next to the version. To upgrade:
update.cmd (recommended)Double-click update.cmd. It runs git pull, refreshes the Python packages, and — if you
already have a Desktop shortcut — refreshes its icon to match the current version.
cd claude-overlay
git pull
(Installed via ZIP instead of git clone? Re-download the latest ZIP from the green
Code button and unzip it over the folder — at minimum replace claude_overlay.py.)
Then restart the overlay. It's a long-running process and does not reload while running — close it and re-open
Start Claude Overlay.cmdfor the update to take effect. Your conversation isn't lost: the relaunch offers a one-click ↺ Resume last conversation, and Claude picks up right where you left off. (On a managed/enterprise machine, updating is what fixes the older versions that could hang on the first tool call.)Updated by hand (
git pull) and the Desktop icon still looks old? Re-runCreate Desktop Shortcut.cmdonce — the shortcut is a machine-specific file thatgit pullcan't refresh (update.cmddoes this for you).
claude --version works and you've logged in (claude auth login).Start Claude Overlay.cmd — launches with no console window.pythonw claude_overlay.py — no console.python claude_overlay.py — keeps a console open for logs (good for debugging).Double-click Create Desktop Shortcut.cmd to drop a Claude Overlay shortcut
— with the orb icon — on your Desktop, so you can launch it like any other app.
Don't just drag
Start Claude Overlay.cmdto your Desktop — it's a portable launcher that must stay next toclaude_overlay.py. The shortcut points back to it in place, which is why it keeps working.
| Action | How |
|---|---|
| Send message | Enter (or click the ↑ button) |
| New line | Shift+Enter |
| Stop a running reply | click Stop (the ↑ becomes ■ while busy) |
| Paste an image | Ctrl+V (click 📎 to clear) |
| Toggle auto-screenshot | ◉ / ○ Auto-shot (orange = on) |
| Settings menu | click ⚙ — Window-only, Shareable, Read-only (✓ = on); the gear turns orange while Read-only is on |
| • Capture only the active window | ⚙ → Window-only (window only; off = every monitor) |
| • Show / hide in screen shares | ⚙ → Shareable (visible to Teams/Zoom/OBS; off = private, the default) |
| • Lock Claude read-only | ⚙ → Read-only ("plan" mode: looks and answers, changes nothing; off = the configured PERMISSION_MODE) |
| Switch model | click the statusline (model ▾) |
| Zoom text in / out | Ctrl + / Ctrl − (or Ctrl + mouse-wheel); Ctrl 0 resets |
| New conversation | Clear |
| Compact the conversation (free up context) | Compact — summarizes older turns, keeps going |
| Copy a reply | click ⧉ Copy under the message |
| Name this overlay | click the title (Claude) — handy with several open |
| Collapse to a Claude orb | –, or double-click the title bar |
| Expand from the orb | click the orb (drag it to move) |
| Quit | ✕ |
| Move | drag the title bar |
| Resize | drag any edge or corner (or the ◢ grip) |
All settings live as constants at the top of config.py — but you don't have to edit
the file. Put personal values in a small per-machine config.json instead, so your
setup survives every update with no git pull conflicts:
%LOCALAPPDATA%\claude-overlay\config.json
(the same folder that already remembers your toggles). List only the settings you want to change, using the constant names below — for example:
{
  "PERMISSION_MODE": "plan",
  "THEME": "dark",
  "WORKING_DIR": "C:\\Users\\you\\Documents"
}
Overridable: WORKING_DIR, MODEL, PERMISSION_MODE, SKILLS, STRICT_MCP_CONFIG,
CLI_UPDATE_CHECK, AUTO_SCREENSHOT_DEFAULT, SHOT_SCOPE, SHOT_FORMAT,
SHOT_JPEG_QUALITY, HIDE_SCREENSHOT_TOOL, THEME, SHOW_IN_SCREEN_SHARE_DEFAULT,
TASKBAR_BUTTON, HOTKEY, WINDOW_ALPHA, CORNER_RADIUS, ORB_SIZE,
FONT_SANS / FONT_SERIF / FONT_MONO.
Precedence, weakest to strongest: the constants in config.py < config.json < an
explicitly set CLAUDE_OVERLAY_* env var — and the remembered ⚙-toggle state
(Window-only / Read-only) still wins over all three, exactly as it does over the
constants: SHOT_SCOPE and PERMISSION_MODE from the file only seed the first launch.
A typo'd key or wrong-typed value is skipped (never fatal) and called out in-chat at
startup, so a mistake can't silently launch a misconfigured session. To keep the file
somewhere else, point the CLAUDE_OVERLAY_CONFIG env var at it.
The settings themselves:
MODEL — defaults to "opus", a family alias for the latest Opus, so a future
Opus release is adopted automatically. Use "opus[1m]" for the 1M-context variant, or
"sonnet" / "haiku" — every alias tracks the newest model of its family, and the
in-app switcher lists them all (the statusline shows the concrete version each alias
resolved to, e.g. claude-opus-4-8). Don't use None: the Agent SDK resolves None
to an older model, not the CLI's interactive default.PERMISSION_MODE — "bypassPermissions" by default (see security note below); this
is just the first-launch mode — the ⚙ → Read-only menu item switches
the live session between "plan" (read-only) and this mode at any time, and the
toggle remembers your last choice across launches (announced in-chat at startup
whenever the remembered state differs from this default). Set "plan" to start
locked read-only.WORKING_DIR — folder Claude operates in (default: your home directory).THEME — "light" (warm paper) or "dark".TASKBAR_BUTTON — True (default) gives the frameless window a real, clickable
Windows taskbar button; False for the pure no-taskbar floating overlay.SKILLS — which Agent SDK skills to expose: "all", a list of names, or None.STRICT_MCP_CONFIG — True (default) keeps the overlay lean by not inheriting
the MCP servers from your ~/.claude config; set False to expose them here
(handier, but their tool schemas cost a lot of context).SHOT_FORMAT / SHOT_JPEG_QUALITY (or the CLAUDE_OVERLAY_SHOT_FORMAT /
CLAUDE_OVERLAY_SHOT_JPEG_QUALITY env vars) — screenshot payload: "auto" keeps
the smaller of PNG/JPEG per capture; "png"/"jpeg" force one; JPEG quality 50–95.SHOT_SCOPE (or the CLAUDE_OVERLAY_SHOT_SCOPE env var) — what a screenshot covers:
"screens" (default) captures every monitor, one image each; "window" captures
only the active window — more private and cheaper in vision tokens, but Claude
can't see anything outside it. This is just the startup default; flip it live with
the ⚙ → Window-only menu item — and the choice is remembered
across launches (stored per-machine in %LOCALAPPDATA%\claude-overlay\state.json;
setting the env var explicitly overrides it for that launch). While you're typing in the overlay,
"active" means the window you were working in before it (tracked automatically), and
when no usable window exists (fresh launch, desktop focused, window minimized) it
falls back to full-screen capture rather than sending nothing.RESUME_OFFER (or the CLAUDE_OVERLAY_RESUME_OFFER env var) — on launch, offer a
one-click ↺ Resume last conversation when the previous run left one behind (the
session id is remembered per completed turn; Clear wipes it, so a discarded
conversation is never offered back). RESUME_OFFER_MAX_AGE bounds how old a
conversation may be to qualify (default 7 days). The transcript isn't replayed —
Claude just remembers the context and you keep going. Note the overlay resumes the
session it recorded, not "the latest conversation in this directory" — if you
continue that session elsewhere (the CLI or Desktop) afterward, resume still loads its
newest state, but the "from … ago" label is measured from the overlay's last turn.AUTO_SCREENSHOT_DEFAULT, FONT_SANS/SERIF/MONO, CORNER_RADIUS, ORB_SIZE,
HIDE_SCREENSHOT_TOOL, WINDOW_ALPHA — see inline comments.The default PERMISSION_MODE = "bypassPermissions" makes this a fully
autonomous agent: Claude can edit files and run commands in WORKING_DIR
without asking, and it can see your screen. Combined with screen vision, that
also lets it act on the app you have open — e.g. edit the document or slide
deck on your screen via Windows/COM automation, and (with autosave on) persist
those edits straight to the original file. That's the magic, but it also means it
can change important documents without a confirmation step — double-check before
you let it loose on anything you can't afford to lose. If you don't want that, open
the ⚙ menu and turn on Read-only: it switches the live session into "plan"
mode (Claude looks, reads, and answers — but edits and runs nothing), and while it's
on the overlay denies every permission escalation the agent asks for (including
ExitPlanMode), so read-only can't be talked out of; flip it back for full access.
(One nuance: the CLI refuses to elevate a session to bypassPermissions unless it was
launched in it — so when the overlay started read-only, flipping the toggle off lands
on acceptEdits instead, which the overlay's auto-approval makes effectively full
access; the in-chat notice always names the mode you actually got.)
To start locked on first launch, set PERMISSION_MODE = "plan" — after that the
toggle's last state is remembered per-machine, and a launch says so in-chat whenever
the remembered choice differs from the configured default. ("acceptEdits" / "default" are
of limited use here: a GUI with no terminal has nowhere to show a permission prompt,
so the overlay auto-answers them — see worker._allow_tool.)
Issues and PRs are welcome — bug reports, feature ideas, and especially help making it cross-platform (macOS/Linux capture + windowing). See CONTRIBUTING.md for how to get started.
MIT © shengyanlin
Built with Claude Code. If it earned a spot on your screen, leave a ⭐ — it genuinely helps.
⚠️ Experimentelle Skill-Sammlung für deutsches Recht (Arbeits-, Gesellschafts-, Insolvenz-, Datenschutz-, Prozessrecht u
Manage multiple Claude Code agents from TUI or Web with tmux and git worktrees
Project management using GitHub Issues + Git worktrees for parallel agent execution
Core skills library for Claude Code with 20+ battle-tested skills including TDD, debugging, and brainstorming