

Secure local MCP bridge for ChatGPT and local agents with workspace-scoped tasks, safe summaries, audits, and Direct edi
简体中文 · English


让 ChatGPT、Codex 等 MCP 客户端负责规划与验收,让本地编程 Agent 在明确的安全边界内执行,并留下可审计证据。
PatchWarden 是一个面向本地编程 Agent 的安全 MCP 桥接器。上游的 ChatGPT、Codex、OpenCode 或其他 MCP 客户端负责规划与验收, PatchWarden 负责把计划保存成工作区内任务,再由预先配置的本地 Agent 执行,并返回结果、代码差异和独立测试记录。
下载 Windows 安装版 v1.6.2 · 免安装 ZIP · 校验文件 · 三分钟快速开始 · Discussions
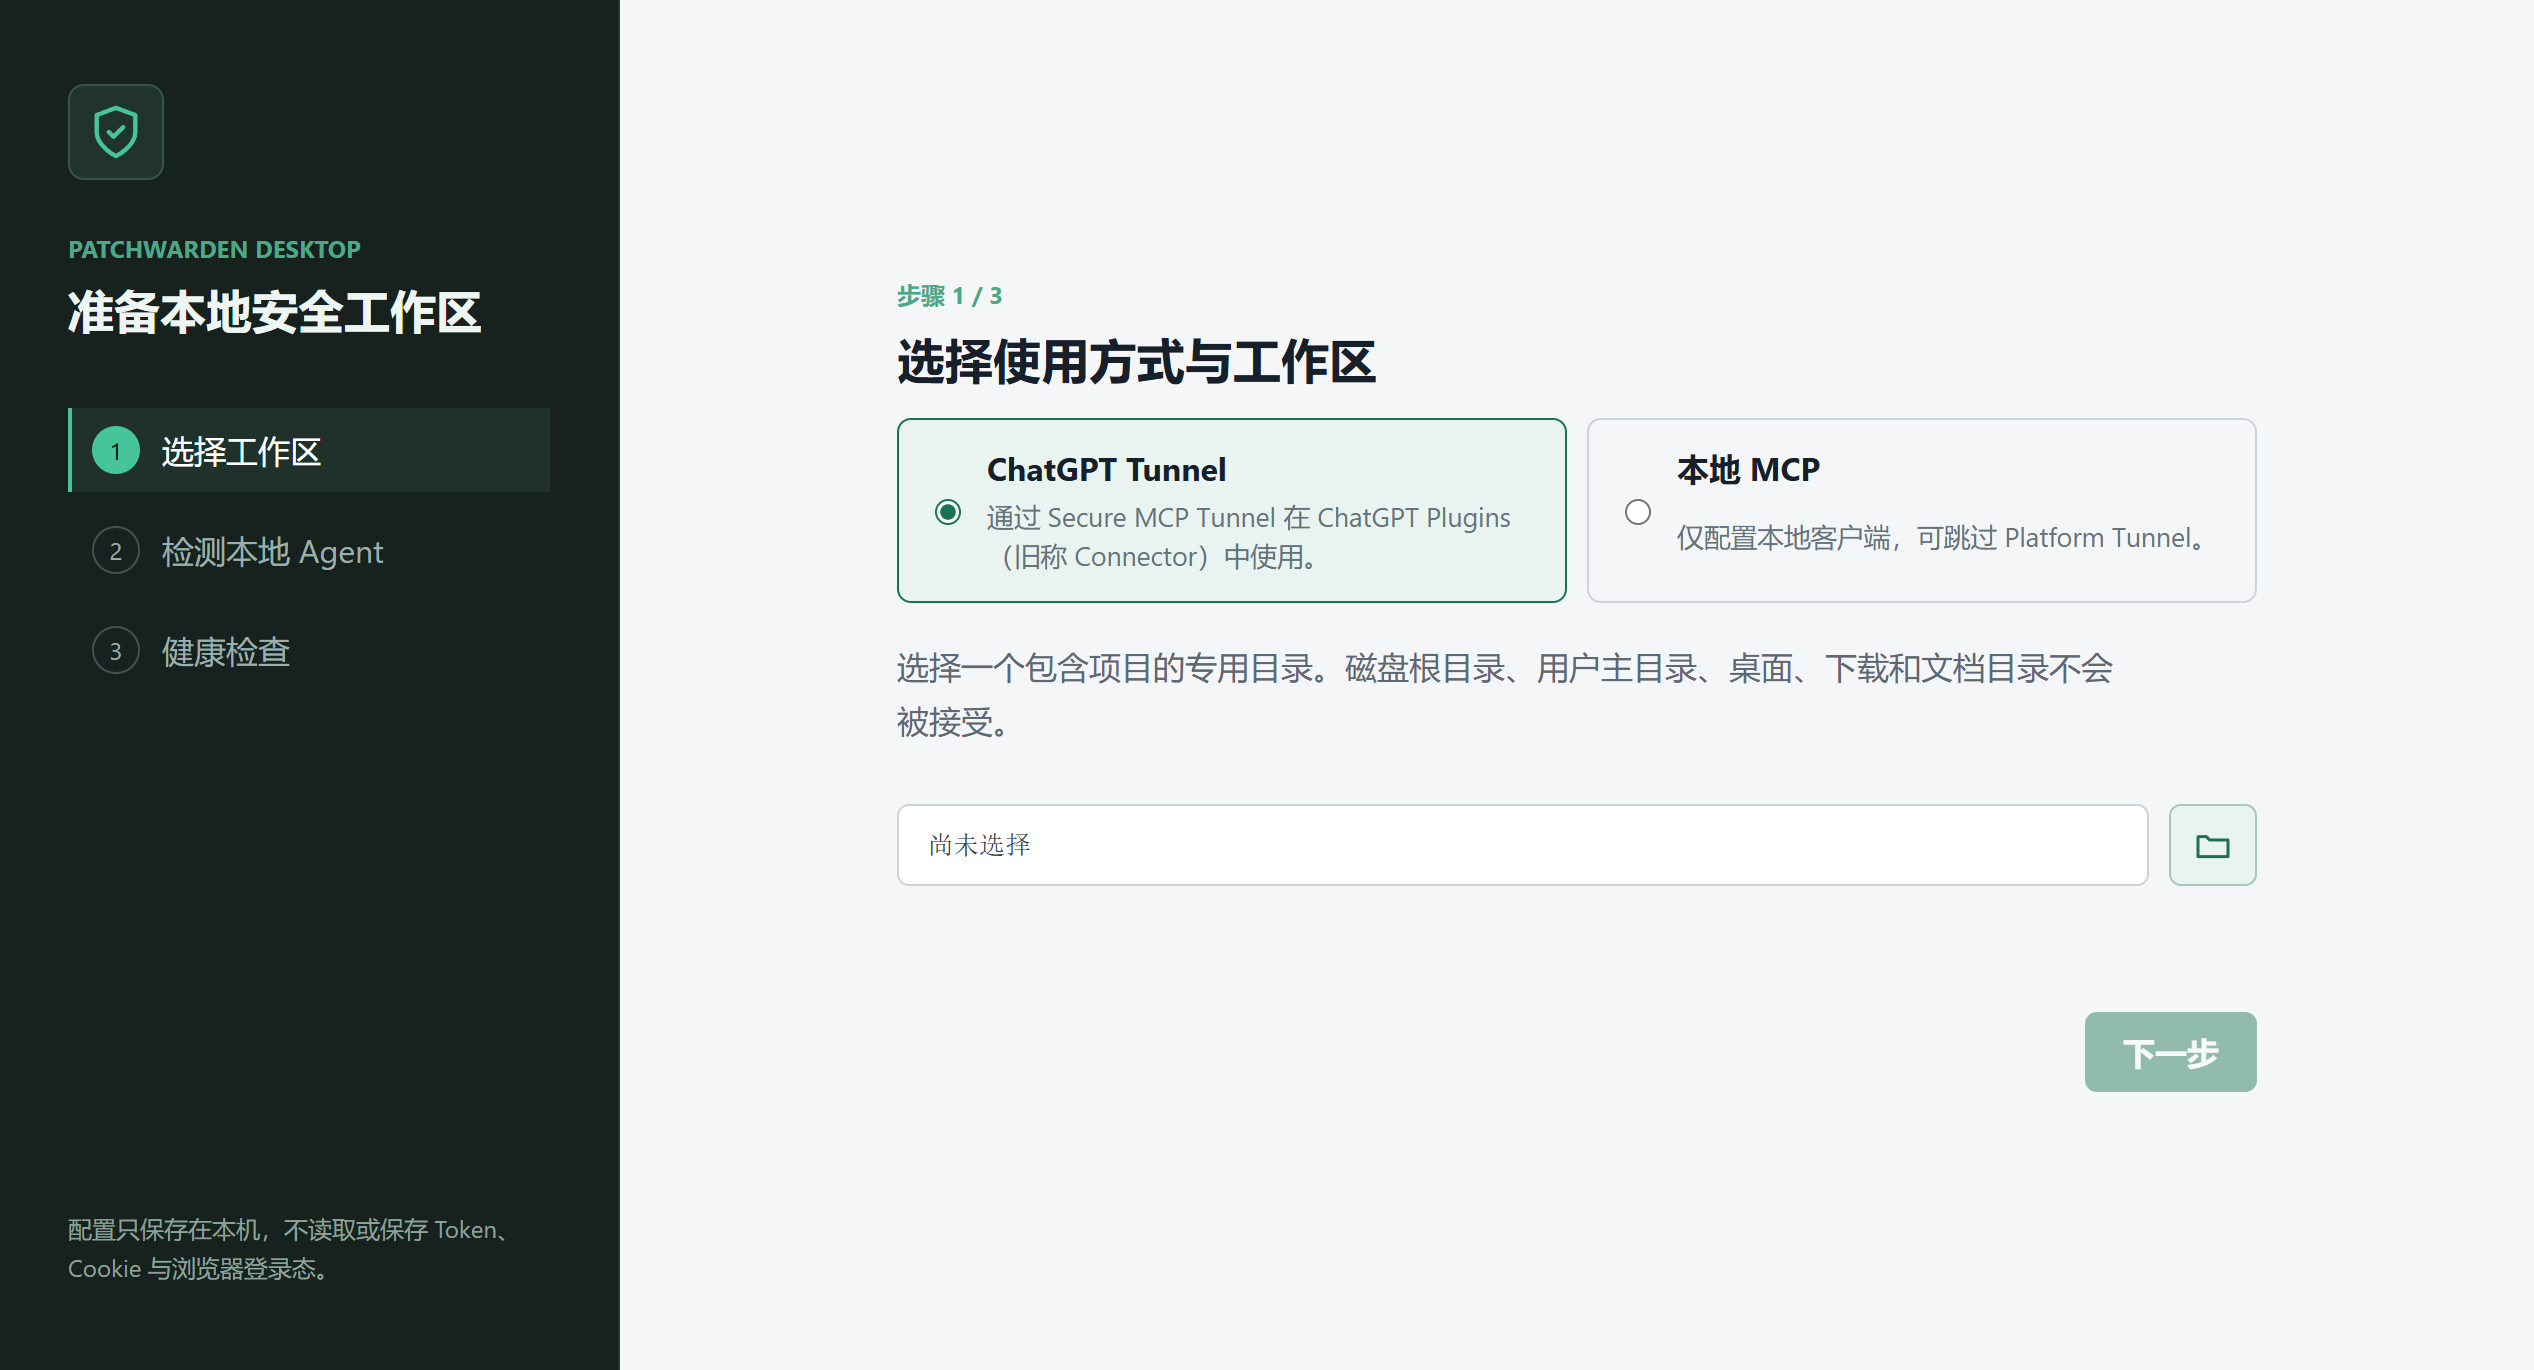
PatchWarden Desktop 真实首启界面,来自隐私安全的桌面 smoke 验收;截图未使用真实工作区、账号或凭据。
当前源码版本和 Windows Release:v1.6.2。npm latest 由维护者独立手动发布,
请以页面顶部的 npm 徽章和注册表查询结果为准。Windows 首次体验推荐上面的安装版;查看
CHANGELOG、迁移指南和
发布检查清单。
[!NOTE] 当前桌面安装包暂时只提供 Windows x64。macOS、Linux 或暂时不安装桌面版的用户, 可以继续使用 npm 上已有的稳定版本及其内置本地 Dashboard;本次 GitHub Release 不自动执行
npm publish。
[!IMPORTANT] PatchWarden 不是通用远程 Shell。MCP 客户端不能随意执行命令: 文件必须位于配置的工作区内,Agent 必须预先登记,验证命令必须与白名单 完全一致,敏感文件名会被阻止。
很多本地编程桥会把完整 Shell 暴露给上游模型。PatchWarden 采用更窄、 更容易审计的任务通道:
workspaceRoot 内的 repo_path。allowedTestCommands。.patchwarden/ 不是敏感路径豁免区;.env、Token、SSH 密钥、Cookie、凭据文件等敏感名称无论位于哪一层目录都不可读。适合的场景:
result.json、diff.patch、verify.json 并独立验收。不适合的场景:
ChatGPT / Codex / OpenCode / 其他 MCP 客户端
                    |
                    v
          PatchWarden MCP Server
                    |
          save_plan / create_task
                    |
                    v
       .patchwarden/tasks/<task_id>/
                    |
              Watcher 发现任务
                    |
                    v
        本地 Agent(OpenCode / Codex)
                    |
                    v
 result.json / diff.patch / verify.json / status.json
                    |
                    v
       MCP 客户端读取、审计、人工验收
一次完整运行通常包含三个角色:
[!WARNING] “MCP 已连接”不等于“任务一定会执行”。如果 Watcher 没有运行,
create_task仍能保存任务,但任务会保持 queued,并返回execution_blocked: true。
git.diff)tunnel-client.exe、Tunnel ID 和运行时 API KeyWindows PowerShell 检查:
node -v
npm.cmd -v
git --version
where.exe opencode
where.exe codex
如果 where.exe codex 只返回 WindowsApps 下的 Codex Desktop
应用程序,它不一定是可供 PatchWarden 调用的 Codex CLI。请安装或指定真正的
CLI,或者先把 OpenCode 配置为执行 Agent。
如果已经安装 Node.js 18+ 和至少一个本地编程 Agent,这条 Windows 路径的目标是 在三分钟内完成首次只读健康检查。首次体验不需要配置 ChatGPT Tunnel。
Get-FileHash .\PatchWarden-Setup-1.6.2-x64.exe -Algorithm SHA256
请以同一 Release 的校验文件为准。安装包尚未代码签名,Windows SmartScreen 可能显示“未知发布者”。
成功标志:向导能够进入只读控制台,显示所选工作区,并完成 Agent 与运行环境检查。 安装成功或遇到阻塞时,请到 Discussions 记录操作系统、Node.js 版本、使用的 Agent 和卡住的步骤。
源码方式最适合完整使用 Watcher、Windows 一键启动器和诊断脚本。
Windows PowerShell:
git clone https://github.com/jiezeng2004-design/PatchWarden.git
cd .\PatchWarden
npm.cmd ci
npm.cmd run build
Copy-Item .\examples\config.example.json .\patchwarden.config.json
然后编辑 patchwarden.config.json,至少修改:
workspaceRootagentsallowedTestCommands运行只读诊断:
npm.cmd run doctor
启动 Watcher:
$env:PATCHWARDEN_CONFIG = (Resolve-Path .\patchwarden.config.json)
npm.cmd run watch
保持该窗口运行,再按照后文配置 OpenCode、Codex 或 ChatGPT Connector。
npm 包适合让 MCP 客户端通过固定版本启动 PatchWarden。为了执行任务, 仍然必须另外启动 Watcher。
New-Item -ItemType Directory .\patchwarden-runtime
Set-Location .\patchwarden-runtime
npm.cmd init -y
npm.cmd install patchwarden@<published-version>
Copy-Item .\node_modules\patchwarden\examples\config.example.json .\patchwarden.config.json
$env:PATCHWARDEN_CONFIG = (Resolve-Path .\patchwarden.config.json)
node .\node_modules\patchwarden\dist\runner\watch.js
MCP 客户端可以使用:
npx.cmd -y patchwarden@<published-version>
将 <published-version> 替换为已经在 npm/GitHub 上确认存在的版本;不要在重要环境中无条件使用 latest。
从示例创建本地配置:
Copy-Item .\examples\config.example.json .\patchwarden.config.json
推荐的 Windows 示例:
{
  "workspaceRoot": "D:/ai_agent/codex_program",
  "plansDir": ".patchwarden/plans",
  "tasksDir": ".patchwarden/tasks",
  "toolProfile": "full",
  "agents": {
    "opencode": {
      "command": "opencode",
      "args": ["run", "{prompt}"],
      "envAllowlist": []
    },
    "codex": {
      "command": "codex",
      "args": ["exec", "--cd", "{repo}", "{prompt}"],
      "envAllowlist": []
    }
  },
  "allowedTestCommands": [
    "npm test",
    "npm run build",
    "npm run lint",
    "pytest"
  ],
  "repoAllowedTestCommands": {
    "desktop-app": ["npm run release:check"]
  },
  "maxReadFileBytes": 200000,
  "defaultTaskTimeoutSeconds": 900,
  "maxTaskTimeoutSeconds": 3600,
  "watcherStaleSeconds": 30,
  "httpPort": 7331
}
字段说明:
| 字段 | 是否必需 | 说明 |
|---|---|---|
workspaceRoot | 是 | PatchWarden 唯一允许访问的工作区根目录。 |
plansDir | 是 | 计划目录,通常使用 .patchwarden/plans。 |
tasksDir | 是 | 任务和结果目录,通常使用 .patchwarden/tasks。 |
toolProfile | 否 | full、chatgpt_core、chatgpt_direct 或 chatgpt_search;本地客户端推荐 full,动态工具发现场景使用 chatgpt_search。 |
agents | 是 | 可执行 Agent 白名单;支持 {repo} 和 {prompt} 占位符。 |
agents.<name>.envAllowlist | 否 | 显式传给该 Agent 的 provider 环境变量名;默认不继承。Tunnel owner token 禁止透传。 |
allowedTestCommands | 是 | 独立验证命令白名单,调用时必须精确匹配。 |
repoAllowedTestCommands | 否 | 按工作区相对仓库路径增加精确验证命令;不支持通配符。 |
maxReadFileBytes | 是 | MCP 单次文件读取上限。 |
defaultTaskTimeoutSeconds | 是 | 默认任务超时。 |
maxTaskTimeoutSeconds | 是 | 客户端可请求的最大任务超时。 |
watcherStaleSeconds | 是 | Watcher 心跳超过该时间后视为失联,范围为 5–3600 秒。 |
repoAliases | 否 | 给工作区内仓库设置简短别名。 |
httpPort | 否 | 本地 HTTP MCP 端口,默认 7331。 |
http.ownerTokenEnv | 否 | HTTP 鉴权 Token 所在的环境变量名。 |
配置注意事项:
D:/path/to/project。D:\\path\\to\\project。workspaceRoot 设置成磁盘根目录、用户主目录、桌面、下载或文档目录。plansDir 和 tasksDir 相对于 workspaceRoot 解析。repo_path 必须位于 workspaceRoot 内,不能通过 .. 跳出。allowedTestCommands 是精确匹配,不会把相似命令自动视为已授权。package.json 自行扩权。设置配置路径:
$env:PATCHWARDEN_CONFIG = "D:\path\to\patchwarden.config.json"
该环境变量只影响当前 PowerShell 及其子进程。如果从另一个窗口启动 Watcher 或 MCP Server,需要在那个窗口重新设置。
推荐从本地源码启动,以便版本、Watcher 和配置文件保持一致。
编辑 OpenCode 配置:
%USERPROFILE%\.config\opencode\opencode.jsonc
示例:
{
  "mcp": {
    "patchwarden": {
      "type": "local",
      "command": [
        "node",
        "D:/path/to/PatchWarden/dist/index.js"
      ],
      "environment": {
        "PATCHWARDEN_CONFIG": "D:/path/to/PatchWarden/patchwarden.config.json",
        "PATCHWARDEN_TOOL_PROFILE": "full"
      },
      "enabled": true
    }
  }
}
验证:
opencode mcp list
预期看到:
patchwarden connected
然后在 PatchWarden 项目目录的另一个 PowerShell 窗口启动:
$env:PATCHWARDEN_CONFIG = (Resolve-Path .\patchwarden.config.json)
npm.cmd run watch
如果 OpenCode 能看到 MCP 工具,但创建的任务一直 queued,先检查 Watcher, 不要反复删除并重建 MCP 配置。
编辑:
%USERPROFILE%\.codex\config.toml
使用 npm 固定版本:
[mcp_servers.patchwarden]
command = "npx.cmd"
args = ["-y", "patchwarden@<published-version>"]

[mcp_servers.patchwarden.env]
PATCHWARDEN_CONFIG = "D:\\path\\to\\patchwarden.config.json"
PATCHWARDEN_TOOL_PROFILE = "full"
或使用本地源码:
[mcp_servers.patchwarden]
command = "node"
args = ["D:\\path\\to\\PatchWarden\\dist\\index.js"]

[mcp_servers.patchwarden.env]
PATCHWARDEN_CONFIG = "D:\\path\\to\\PatchWarden\\patchwarden.config.json"
PATCHWARDEN_TOOL_PROFILE = "full"
修改后完全退出并重新打开 Codex Desktop,再新建会话。已经打开的会话可能仍 保留旧 MCP 工具目录。
同样需要单独运行 Watcher。Codex 作为 MCP 客户端 和 Codex CLI 作为 任务执行 Agent 是两个不同角色;前者连接成功不能证明后者命令可用。
当前 ChatGPT 术语为 developer-mode app / Plugins;旧版文档与部分界面曾称为 Connector。新配置请以 Plugins 为准。
tunnel-client.exe;应用不会自动下载或执行新软件。CONTROL_PLANE_API_KEY,不是普通应用使用的 OPENAI_API_KEY。patchwarden profile,运行 tunnel-client doctor --explain --json,验证成功后才用 Windows DPAPI 保存凭据;随后启动 Core。chatgpt_core 发现固定的 26 个工具。Direct 是设置页中的可选高级能力,未启用时“全部启动”只启动 Core。health_check 验证。首次引导也可选择“本地 MCP”。该路线只配置安全工作区和本地 MCP 客户端,可以跳过第 1、2、4、5、7、8 步中的 Platform/ChatGPT Tunnel 操作。
推荐的 Windows 链路:
ChatGPT Web
→ ChatGPT Connector
→ OpenAI Secure MCP Tunnel
→ PatchWarden stdio MCP
→ Watcher
→ 本地 Agent
准备好以下内容:
patchwarden.config.jsontunnel-client.exe先按下一节配置代理,然后运行:
PatchWarden.cmd start core
启动器会:
dist/index.js,缺失时自动构建。chatgpt_core 的版本、26 个核心工具和 Schema Manifest。%APPDATA%\patchwarden。tunnel-client doctor 和 readiness 检查。运行时状态位于:
%LOCALAPPDATA%\patchwarden\runtime
这里包含 PID、健康状态和脱敏诊断信息,不应包含 API Key 或 Tunnel ID。
ChatGPT Connector 创建时:
127.0.0.1 URL 当成公网 Server URL。更完整的 Tunnel 示例见 examples/openai-tunnel/README.md。
scripts/control/start-patchwarden-tunnel.ps1 优先读取当前进程的
HTTPS_PROXY。如果没有设置,它会默认使用:
http://127.0.0.1:7892
7892 不是通用端口。 Clash、Mihomo、V2Ray、sing-box 或其他代理工具 可能使用 7890、7897、10809 或自定义端口。请在代理软件中确认 HTTP/Mixed 监听端口,不要照抄示例。
先测试端口:
Test-NetConnection 127.0.0.1 -Port 7892
如果 TcpTestSucceeded 为 False,说明该端口没有代理服务。
以下命令只影响当前 PowerShell 和从它启动的子进程,不修改系统级环境变量:
$env:HTTPS_PROXY = "http://127.0.0.1:你的HTTP或Mixed端口"
$env:HTTP_PROXY  = $env:HTTPS_PROXY
$env:ALL_PROXY   = $env:HTTPS_PROXY
$env:NO_PROXY    = "localhost,127.0.0.1,::1"
.\PatchWarden.cmd start core
例如代理软件的 Mixed 端口是 7890:
$env:HTTPS_PROXY = "http://127.0.0.1:7890"
$env:HTTP_PROXY  = $env:HTTPS_PROXY
$env:ALL_PROXY   = $env:HTTPS_PROXY
$env:NO_PROXY    = "localhost,127.0.0.1,::1"
.\PatchWarden.cmd start core
这里的 HTTPS_PROXY=http://... 并不矛盾:变量名表示 HTTPS 请求通过代理,
URL 的 http:// 表示连接到本地 HTTP 代理端口。不要把只支持 SOCKS 的端口
误填到当前 --http-proxy 参数中。
| 网络路径 | 是否需要代理 | 说明 |
|---|---|---|
| Tunnel → OpenAI control plane | 通常需要 | 一键启动器通过 HTTPS_PROXY 传给 tunnel-client。 |
PatchWarden → 127.0.0.1 | 不需要 | 必须保留 NO_PROXY=localhost,127.0.0.1,::1。 |
| 本地 Agent → 模型提供方 API | 视 Agent 而定 | Watcher/Agent 可能继承当前终端的代理变量。 |
| npm / GitHub | 视网络而定 | 与 Tunnel 是否健康是两回事,要分别诊断。 |
如果手动启动 Watcher,希望它和子 Agent 使用同一代理,要在启动 Watcher 的那个 PowerShell 窗口设置代理变量。
如果日志出现:
unsupported_country_region_territory
403 Forbidden
说明代理出口区域不被当前 OpenAI control plane 接受。继续重装依赖、
重建 dist 或反复登录通常无效;应先切换到受支持的出口区域,再重新启动
Tunnel。支持范围可能变化,因此不要在项目里写死国家列表。
Test-NetConnection 是否成功。HTTPS_PROXY 是否在启动 Tunnel 的同一个 PowerShell 中设置。NO_PROXY 是否包含本地地址。PatchWarden.cmd health 和 tunnel-client doctor。推荐顺序:
health_check:确认版本、工作区、Watcher 和工具目录。list_agents:确认本地 Agent 可执行文件可用;该检查不会验证模型提供商余额、登录态或调用权限,结果中的 provider_status 默认为 not_checked。list_workspace:确定 repo_path。save_plan,或在创建任务时提供 inline_plan。create_task:明确 Agent、仓库和验证命令。wait_for_task(timeout_seconds: 25);长任务使用 list_tasks 和 get_task_status 轮询。get_task_summary(view: "compact"):先看有界结构化总结。get_result_json、get_diff、get_test_log:按需查看细节。audit_task:独立核对执行结果。create_task 示例:
{
  "agent": "opencode",
  "repo_path": "my-project",
  "inline_plan": "修复登录页的表单校验,不改动无关文件,并补充回归测试。",
  "verify_commands": [
    "npm run build",
    "npm test"
  ],
  "timeout_seconds": 900
}
要求:
repo_path 必须在 workspaceRoot 内。verify_commands 必须逐字匹配全局或当前仓库的可信命令白名单。plan_id、inline_plan、template 三种计划来源必须且只能选择一种。wait_for_task 返回 continuation_required: true 时,应继续调用。terminal: true 只表示任务进入终态,不代表结果一定正确。内置模板:
inspect_onlyfeature_smallfix_testsrelease_checkrollback_scope_violationChatGPT 任务应优先选择前三个守护模板:只读诊断使用 inspect_only,小范围功能修改使用 feature_small,已知测试失败修复使用 fix_tests。只有模板无法准确表达目标时,才使用 inline_plan 或已保存的长计划。建议先以 execution_mode: "assess_only" 评估,再直接调用返回的 next_tool_call;执行阶段不要重复发送 goal、plan、仓库或验证参数。
inspect_only 和回滚审查模板如果修改文件,会以
failed_policy_violation 失败。回滚审查只生成方案,不会自动回滚用户修改。
audit_task 的 fail 检查会列入 confirmed_failures;启发式警告会单独列入 possible_false_positives 和 manual_verification_items。因此 warn 不等于已确认错误,仍需按人工核实项检查证据。
| 文件 | 用途 |
|---|---|
status.json | 当前状态、阶段、心跳和错误信息。 |
progress.md | Agent 写入的进度记录。 |
result.md | 人类可读的执行报告。 |
result.json | 结构化结果、路径、变更、警告和后续建议。 |
diff.patch | 最多 20 MiB 的任务差异证据;疑似凭据会在落盘前脱敏,超限会明确标记截断。 |
artifact_manifest.json | 构建或发布产物的路径、类型、大小与 SHA-256。 |
file-stats.json | 文件级增删统计。 |
verify.json | 每条独立验证命令的结构化记录。 |
verify.log | 独立验证的可读日志。 |
test.log | Agent 执行过程中产生的测试输出。 |
面向客户端的任务产物读取受 maxReadFileBytes 限制;diff、summary 与日志 tail
只读取有界前缀或尾部。audit_task 最多扫描 200 个 Markdown 文件和 4 MiB 文档内容,
达到预算会返回 warning。invocation/reconcile 等持续日志使用跨进程锁内的有界追加,
超限时保留最近内容并写入明确的截断标记。
本地 Agent 声称“已推送”“已发布”不属于可靠的远程证据。GitHub、npm、 Tag 和 Release 必须再用对应平台的实时状态核验。
HTTP Server 只绑定 127.0.0.1,默认端口 7331,不会直接监听局域网;
HTTP MCP 与 Control Center 同时拒绝非 127.0.0.1/localhost 的 Host,防止 DNS rebinding 绕过回环边界。
终端 1,启动 Watcher:
$env:PATCHWARDEN_CONFIG = (Resolve-Path .\patchwarden.config.json)
npm.cmd run watch
终端 2,启动 HTTP MCP:
$env:PATCHWARDEN_CONFIG = (Resolve-Path .\patchwarden.config.json)
npm.cmd run start:http
健康检查:
Invoke-RestMethod http://127.0.0.1:7331/healthz
MCP 地址:
http://127.0.0.1:7331/mcp
可选 Token 配置:
{
  "httpPort": 7331,
  "http": {
    "ownerTokenEnv": "PATCHWARDEN_OWNER_TOKEN"
  }
}
在启动 Server 的当前 PowerShell 中设置:
$env:PATCHWARDEN_OWNER_TOKEN = "请使用随机且仅保存在本机的值"
客户端可使用 Authorization: Bearer ... 或 x-patchwarden-token。
不要把 Token 直接写进配置、README、日志或 Git。
[!CAUTION] 不要通过路由器端口映射、
0.0.0.0转发或普通反向代理直接公开 本地 7331 端口。远程接入应使用经过认证的安全 Tunnel。
项目诊断:
npm.cmd run doctor
它会检查 Node、npm、Git、配置、工作区、路径保护、敏感文件保护、Agent 命令、工具 Manifest、HTTP 端口、Watcher 目录和构建产物。
双击 PatchWarden.cmd 会打开统一菜单,可分别或同时管理 Core Agent 和
Direct 两种模式的启动、停止、重启与状态。也可以在 PowerShell 中直接调用:
.\PatchWarden.cmd start core
.\PatchWarden.cmd start direct
.\PatchWarden.cmd stop all
.\PatchWarden.cmd restart all
.\PatchWarden.cmd status all
.\PatchWarden.cmd kill all
.\scripts\launchers\Stop-PatchWarden.cmd
日常桌面入口:scripts\launchers\PatchWarden-Desktop.cmd 启动托盘并确保 Control Center 可用,不自动打开额外浏览器窗口。只有调试托盘时才使用 scripts\launchers\PatchWarden-Control-Tray.cmd --foreground;需要完整 Web 控制台时打开 scripts\launchers\PatchWarden-Control.cmd;需要一键收尾时使用 scripts\launchers\Stop-PatchWarden.cmd 关闭 Core/Direct、Control Center 和托盘。
公开分发可以构建 PatchWarden Desktop 安装包和免安装 ZIP。它提供 Electron
独立窗口、首次工作区引导、系统托盘和设置页,同时继续复用相同的
loopback Control Center 与安全控制 API。桌面依赖隔离在私有的
desktop/ 子包中,不进入 patchwarden npm 包。
安装版仍要求 Windows x64、Node.js 18+ 和 tunnel-client。首次启动会在
PATH、当前用户目录和工作区附近做有界检测;未找到时可进入只读控制台,
再从“设置 -> MCP 与隧道”选择 tunnel-client.exe 并查看 SHA256 校验步骤。
应用不会自动下载或运行新软件。设置页还提供 Direct 显式开关,以及环境代理、
无代理、手动代理三种模式;手动代理只接受不含凭据的 http/https/socks5 URL。
启动和重启只有在 health/ready 与 Core Watcher 验证通过后才会报告成功。
桌面端支持 Codex、OpenCode、Claude Code、Gemini CLI、GitHub Copilot CLI、
Qwen Code、Kimi Code 和 Aider;只读取各 Agent 配置中的模型字段,不读取凭据。
npm.cmd install --prefix desktop --cache .\.npm-cache
npm.cmd run desktop:test
npm.cmd run desktop:preflight
npm.cmd run desktop:package
安装包、免安装 ZIP 与 SHA256 文件输出到 release\desktop。首版不包含自动更新或
代码签名,Windows SmartScreen 可能提示未知发布者;发布前必须核对
GitHub Release 来源和 SHA256。完整安装、运行与卸载说明见
docs/desktop-app.md。
desktop:preflight 会使用唯一目录完成 clean build、完整单测、桌面测试、npm 包面、
Electron 目录包、仓库外 26-tool manifest 与隔离 unpacked UI/单实例验收,并生成
preflight-report.json / preflight-report.md。正式发布前必须在干净 checkout 运行
npm.cmd run desktop:preflight:release;该命令发现未提交路径时会直接阻断。
旧的单用途入口保留在 scripts/launchers/ 作为兼容层;个人入口位于
.local/launchers/,并继续被 Git 和发布包排除。stop / restart 会同时检查
运行状态、精确的 Tunnel Profile、项目启动器和进程树,因此可以清理同一 Profile
遗留的 tunnel-client.exe,但不会结束无关进程。kill 是显式强制清理入口,
仍受相同的 Profile 和项目路径约束;发现 8080/8081 被无关进程占用时会停止操作并报告 PID。
status 会交叉检查 runtime JSON、health URL 文件、固定的 /readyz / /healthz
端点和真实进程。即使状态文件陈旧,只要 health endpoint 已 ready,也会报告实际运行状态。
supervisor 的最新输出位于:
%LOCALAPPDATA%\patchwarden\runtime\tunnel-client.stdout.log
%LOCALAPPDATA%\patchwarden\runtime\tunnel-client.stderr.log
%LOCALAPPDATA%\patchwarden\runtime-direct\tunnel-client.stdout.log
%LOCALAPPDATA%\patchwarden\runtime-direct\tunnel-client.stderr.log
非零退出时,窗口会显示 stderr 最后 30 行;tunnel-status.json 同时记录退出码、
脱敏后的 stdout/stderr tail 和日志路径,不会输出 API Key 值。
Windows Tunnel 深度健康检查:
PatchWarden.cmd health
它会报告:
dist 版本它只读诊断,不会结束进程。
MCP 内部的扩展诊断:
{
  "detail": "self_diagnostic"
}
可配合 health_check 查看 Agent、白名单、最近失败任务和工具目录一致性。
配置或版本更新后需要完整重启时,可运行:
PatchWarden.cmd restart all
该命令只停止当前项目拥有的启动器/Watcher,以及 Profile 精确匹配的
tunnel-client.exe,不会全局结束其他 PatchWarden、OpenCode 或 Codex 实例。
Core Agent 和 Direct 可以同时运行,使用不同的 tunnel-client profile:
| 模式 | Profile | Tool Profile | 默认 Health 端口 |
|---|---|---|---|
| Core | patchwarden | chatgpt_core | 127.0.0.1:8080 |
| Direct | patchwarden-direct | chatgpt_direct | 127.0.0.1:8081 |
为避免两个 tunnel-client 实例的 health 端口冲突,启动时需要显式指定端口:
Core 启动示例:
powershell.exe -NoProfile -ExecutionPolicy Bypass -File "%CD%\scripts\control\start-patchwarden-tunnel.ps1" -ToolProfile chatgpt_core -Profile patchwarden -HealthListenAddr 127.0.0.1:8080
Direct 启动示例:
powershell.exe -NoProfile -ExecutionPolicy Bypass -File "%CD%\scripts\control\start-patchwarden-tunnel.ps1" -ToolProfile chatgpt_direct -Profile patchwarden-direct -HealthListenAddr 127.0.0.1:8081 -SkipWatcher
如果使用 .local\launchers\ 下的个人启动器,也需要同步追加对应
-HealthListenAddr 参数(Start-PatchWarden-Tunnel.local.cmd 加 -HealthListenAddr 127.0.0.1:8080,
Start-PatchWarden-Direct-Tunnel.local.cmd 加 -HealthListenAddr 127.0.0.1:8081)。
如果未传入 -HealthListenAddr,脚本会根据 Profile 自动选择:
chatgpt_core / patchwarden → 127.0.0.1:8080,
chatgpt_direct / patchwarden-direct → 127.0.0.1:8081。
PatchWarden Dashboard (Control Center) 提供以下主要页面:
推荐工作流:
详细说明见 docs/dashboard-overview.md、docs/task-safe-review-workflow.md、docs/lineage-evidence-pack-workflow.md、docs/direct-session-workflow.md。
| 现象 | 最可能原因 | 处理方式 |
|---|---|---|
| Tunnel 一直连接超时 | 默认 7892 没有代理服务 | 确认实际 HTTP/Mixed 端口,设置 HTTPS_PROXY 后从同一窗口启动。 |
日志出现 403 和 unsupported_country_region_territory | 代理出口区域不受支持 | 切换出口区域,再重启 Tunnel。 |
list_workspace 只看到 tunnel-client.exe | MCP 从错误目录启动或没收到配置路径 | 使用 scripts/mcp/patchwarden-mcp-stdio.cmd。 |
| MCP 显示 connected,但任务不执行 | Watcher 没启动或心跳过期 | 启动 npm.cmd run watch,再看 health_check。 |
Agent command not found | Agent 不在 PATH,或 Codex Desktop 被误当成 CLI | 运行 where.exe,必要时在 agents.command 写真实 CLI 路径。 |
| 验证命令被拒绝 | 与白名单不是逐字一致 | 把确切命令加入 allowedTestCommands,不要扩大成任意 Shell。 |
| ChatGPT 仍显示旧工具 | Connector 或旧对话缓存了旧 Catalog | 重连 Connector,并新建 ChatGPT 对话。 |
ChatGPT 在 create_task 后停住 | 没在同一轮继续调用 wait_for_task | 按 continuation_required 循环等待,直到 terminal: true。 |
HTTP 启动时报 EADDRINUSE | 7331 已被其他进程占用 | 检查已有实例,或修改 httpPort。 |
| DPAPI 凭据无法解密 | 更换了 Windows 用户、电脑或凭据文件损坏 | 运行 PatchWarden.cmd reset-key 后重新输入。 |
| 修改代码后行为没变化 | 仍在运行旧 dist 或旧进程 | 重新 build,检查版本/Manifest,再重启受控进程。 |
| 两个 tunnel 同时启动时第二个立刻退出 | health 端口冲突(两个 profile 都用了 127.0.0.1:8080) | 确保 core 用 8080、direct 用 8081;检查 patchwarden.yaml 和 patchwarden-direct.yaml 的 health.listen_addr;重新运行启动器让脚本自动修复。 |
| supervisor 只看到 exit code 1 | tunnel-client 的真实错误在子进程 stderr | 查看对应 runtime 的 tunnel-client.stderr.log,或查看 tunnel-status.json.stderr_tail。 |
core 错误地从 opencode-config\tunnel-client 读取 Profile | 旧启动器把 Watcher 的 XDG_CONFIG_HOME 泄漏给 tunnel-client | 升级到 v0.6.0 并执行 PatchWarden.cmd restart core;新版本会隔离 Watcher 专用环境。 |
| npm MCP 握手成功但任务始终 queued | npm 只启动了 MCP Server,没有 Watcher | 在本地安装目录启动 dist/runner/watch.js。 |
| 配置明明存在却提示找不到 | 环境变量只在另一个终端设置,或路径转义错误 | 使用绝对路径,并在启动当前进程的终端设置 PATCHWARDEN_CONFIG。 |
| 旧名称环境变量无效 | v0.4.0 是破坏性改名 | 全部改成 PATCHWARDEN_*,旧配置不会自动回退。 |
MCP connected 只证明客户端成功启动了 PatchWarden MCP Server。完整链路还要 验证:
health_check 能看到正确的工作区。list_agents 能找到执行 Agent。create_task 后任务能从 queued 进入 running。7892 只是当前启动脚本的默认值,不是 Clash 或其他软件的统一标准。
这是最常见的连接超时来源之一。先看代理软件设置,再运行
Test-NetConnection,不要先重装 Node 或 PatchWarden。
HTTP MCP、健康页和 tunnel-client 本地 UI 都使用环回地址。如果系统代理或
全局代理错误拦截了 localhost,本地服务可能明明已启动却访问失败。
保留:
$env:NO_PROXY = "localhost,127.0.0.1,::1"
Connector 和 MCP 客户端可能在会话建立时缓存工具目录。即使代码已更新,
旧对话仍可能显示旧工具或旧参数。应比较 server_version、
schema_epoch 和 tool_manifest_sha256,然后重连并新建会话。
PatchWarden 使用心跳判断 Watcher 是否健康。一键启动器只监督自己创建的
Watcher,重启脚本也只处理记录为当前启动器所有的进程。不要使用模糊的
taskkill /IM node.exe,否则可能结束其他 Node、Codex 或 OpenCode 任务。
把整个磁盘、用户目录或混合工作区设为 workspaceRoot,会增加扫描范围、
隐私风险和误触无关文件的概率。推荐把它限制到装有若干代码仓库的专用目录,
任务再通过相对 repo_path 指向具体项目。
done 只表示 Agent 进程结束。仍需检查:
failed_scope_violationverify.json 是否全部通过diff.patch 是否只包含预期修改audit_task 是否发现结果声明与实际不一致PatchWarden v0.4.0 不自动读取旧 CLI、旧环境变量、旧 Header、旧任务目录或 旧 DPAPI 凭据。旧数据可以保留作备份,但新运行必须使用新名称和新目录。
chatgpt_core 是固定的 26 工具 Profile,适合 ChatGPT Tunnel:
health_check、list_agents、list_workspace、
read_workspace_file、save_plan、create_task、run_task_loop、recommend_agent_for_task、
get_task_lineage、export_task_evidence_pack、get_project_policy、
wait_for_task、get_task_summary、get_diff、get_result、
get_result_json、get_test_log、get_task_status、list_tasks、
cancel_task、audit_task、safe_status、safe_result、safe_audit、safe_test_summary、safe_diff_summary。
get_task_summary 默认保留兼容的 standard 视图;ChatGPT 应优先使用
view: "compact",终态 wait_for_task 也只内嵌 compact 验收证据。
run_task_loop 是 v1.2 的安全编排入口:它只组合现有 create_task、wait_for_task、safe summary 和
audit_task,不会绕过 Watcher、命令白名单、workspace confinement 或确认边界。get_task_lineage
读取 .patchwarden/lineages/<lineage_id>/ 中的有界链路摘要,不返回完整日志或 diff。
v1.4 adds Direct-assisted loop verification. run_task_loop(direct_verify=true)
will create a Direct session only after the watcher-driven task and normal audit
succeed, run allowlisted Direct verification commands, safe-finalize, safe-audit,
and write bounded Direct evidence into lineage. It does not call Direct patching
tools, publish, push, tag, create releases, restart live services, or return full
stdout/stderr/diffs.
v1.5 adds worktree-assisted loop isolation, bounded agent routing, and evidence
pack export. run_task_loop(isolation_mode="worktree") creates an isolated git
worktree for the task and records the worktree id, path, branch, and next action
in lineage. It does not auto-merge or auto-delete the worktree. agent="auto"
uses recommend_agent_for_task to select a configured agent before task
creation. export_task_evidence_pack writes bounded evidence.json and
EVIDENCE.md files under .patchwarden/evidence-packs/<lineage_id>/ without
stdout/stderr tails, full diffs, verification logs, or sensitive file content.
Goal Session 的状态变更通过共享的跨进程 mutation lock 串行化并原子落盘;
非空 Goal 的所有子目标都被 accept_subgoal 接受后,Goal 会自动转为 completed。
create_subgoal_task 以 Goal 已保存的 repo_path 为权威,调用方传入其他仓库会以
goal_repo_mismatch 拒绝;隔离 worktree 也从该仓库创建,且 create/merge/discard
共用仓库级 lifecycle lock。
get_project_policy 是 v1.3 的只读策略入口,返回 .patchwarden/project-policy.json
的有界 effective policy 与 release readiness,不会扩大命令白名单。v1.3 的
release_check、release_prepare、release_verify、release_cleanup 仅在 full
Profile 中可见,不执行 publish、push、tag 或 GitHub Release 写操作。Control Center
Dashboard 会展示 lineage、policy 和 release status 的有界摘要,不返回完整日志、diff 或密钥内容。
full 提供完整 64 工具本地开发目录,包含核心工具、管理工具和 Direct
工具。除 chatgpt_core 外,常用额外管理工具包括:
get_plankill_taskretry_taskget_task_progressget_task_stdout_tailget_task_log_tailchatgpt_direct 是 v0.6.0 新增的 Direct 直接开发 Profile,v1.4 包含 14 个工具:
health_check、list_workspace、create_direct_session、
search_workspace、read_workspace_file、apply_patch、
run_verification、run_direct_verification_bundle、finalize_direct_session、audit_session、safe_direct_summary、safe_finalize_direct_session、safe_audit_direct_session、sync_file。
chatgpt_direct 默认关闭,需要通过 enableDirectProfile: true 或
PATCHWARDEN_TOOL_PROFILE=chatgpt_direct 显式启用。chatgpt_core 保持
26 工具清单。
Tunnel 包装脚本会强制使用 chatgpt_core;普通本地开发默认使用 full。
Direct 模式让 ChatGPT 通过受控 Direct session 直接读取文件、搜索代码、 应用 JSON 补丁、运行白名单验证命令,然后通过 finalize 和 audit 完成独立 审计。该模式不需要本地 Agent 参与,适合在无法或不需要部署 Agent 的场景下 让 ChatGPT 直接完成代码修改。
| 模式 | 流程 |
|---|---|
| Agent 委托模式 | ChatGPT 编写计划 → 本地 Agent 执行 → PatchWarden 审计 |
| Direct 模式 | ChatGPT 创建 session → 读取/搜索文件 → 应用 JSON 补丁 → 运行白名单验证 → finalize → audit |
Agent 委托模式依赖预先登记的本地 Agent(OpenCode / Codex)执行任务;
Direct 模式由 ChatGPT 直接通过 MCP 工具完成编辑,所有写操作绑定到
session_id,并通过独立 audit_session 审计。
在 patchwarden.config.json 中:
{
  "enableDirectProfile": true,
  "toolProfile": "chatgpt_direct"
}
或通过环境变量:
$env:PATCHWARDEN_TOOL_PROFILE="chatgpt_direct"
Direct 模式使用独立入口,不会替换现有的 Agent 委托模式:
PatchWarden.cmd start direct
首次启动时按提示提供 tunnel-client.exe 路径和专用于 Direct Connector 的
Tunnel ID。启动器使用 patchwarden-direct Profile、独立的
%LOCALAPPDATA%\patchwarden\runtime-direct 状态目录,并自动跳过 Watcher;
Tunnel API Key 仍通过现有 Windows DPAPI 缓存处理,不会写入仓库。
连接 ChatGPT 后新建对话并先调用 health_check。预期
tool_profile=chatgpt_direct、tool_count=14、
direct_profile_enabled=true。已有对话可能缓存旧工具清单,需要重新连接
Connector 后再新建对话。
health_check → create_direct_session → search_workspace / read_workspace_file → apply_patch → run_verification → finalize_direct_session → audit_session
Direct 模式在受控 session 内执行,具有以下硬性限制:
.env/token/key/credentialnode_modulesworkspaceRoot 和 session repo 内Direct 模式不支持:shell、delete、rename、commit、push、publish、deployment。
PatchWarden 的主要保护:
workspaceRoot 内。.patchwarden/ 不会绕过该检查。127.0.0.1,并拒绝非回环 Host。需要保护的本地路径:
| 路径 | 内容 | 是否应提交 |
|---|---|---|
patchwarden.config.json | 私人路径、Agent 和命令白名单 | 否 |
.patchwarden/ | 计划、任务、差异和日志 | 否 |
%APPDATA%\patchwarden | DPAPI 加密的 Tunnel 凭据 | 否 |
%LOCALAPPDATA%\patchwarden | 运行时状态和隔离配置 | 否 |
不要提交 API Key、Token、Tunnel ID、ChatGPT Workspace ID、Cookie、
.env、私人项目路径或真实任务日志。
PatchWarden 能降低误操作风险,但不能替代人工审查。第一次使用应选择专用的 测试工作区和可回滚仓库。
升级 npm 固定版本:
npm.cmd install patchwarden@<published-version>
源码升级:
git pull --ff-only
npm.cmd ci
npm.cmd run build
npm.cmd test
更新后:
npm.cmd run doctor。PatchWarden.cmd health。PatchWarden.cmd restart all 重启受控进程。从 Safe-Bifrost 迁移时必须手动完成:
patchwarden、patchwarden-runner,以及仅用于本地中风险票据确认的 patchwarden-confirmpatchwarden.config.jsonPATCHWARDEN_*.patchwarden/x-patchwarden-tokenpatchwarden旧数据不会自动删除,也不会自动回退读取。详见 迁移指南。
Windows PowerShell:
npm.cmd run build
npm.cmd test
npm.cmd run test:mcp
npm.cmd run test:http-mcp
npm.cmd run doctor
npm.cmd run check:tool-manifest
npm.cmd run check:brand
npm.cmd run test:tunnel-supervisor
npm.cmd run test:watcher-supervisor
npm.cmd run pack:clean
npm.cmd run verify:package
打包检查会排除:
node_modules/.patchwarden/*.log.envpatchwarden.config.json发布前不要只相信本地结果,还应分别核验 npm Registry、远程 Tag、GitHub Release 和发布资产校验值。
Run Claude Code as an MCP server so any agent can delegate coding tasks to it
 @microsoft✓ Official
Browser automation using accessibility snapshots instead of screenshots
 @googleapis✓ Official
Google's universal MCP server supporting PostgreSQL, MySQL, MongoDB, Redis, and 10+ databases
 @github✓ Official
Official GitHub integration for repos, issues, PRs, and CI/CD workflows
 @jiezeng2004-design