

Are you the author? Sign in to claim
Autonomous SWE agent working in the cloud!
English | 日本語
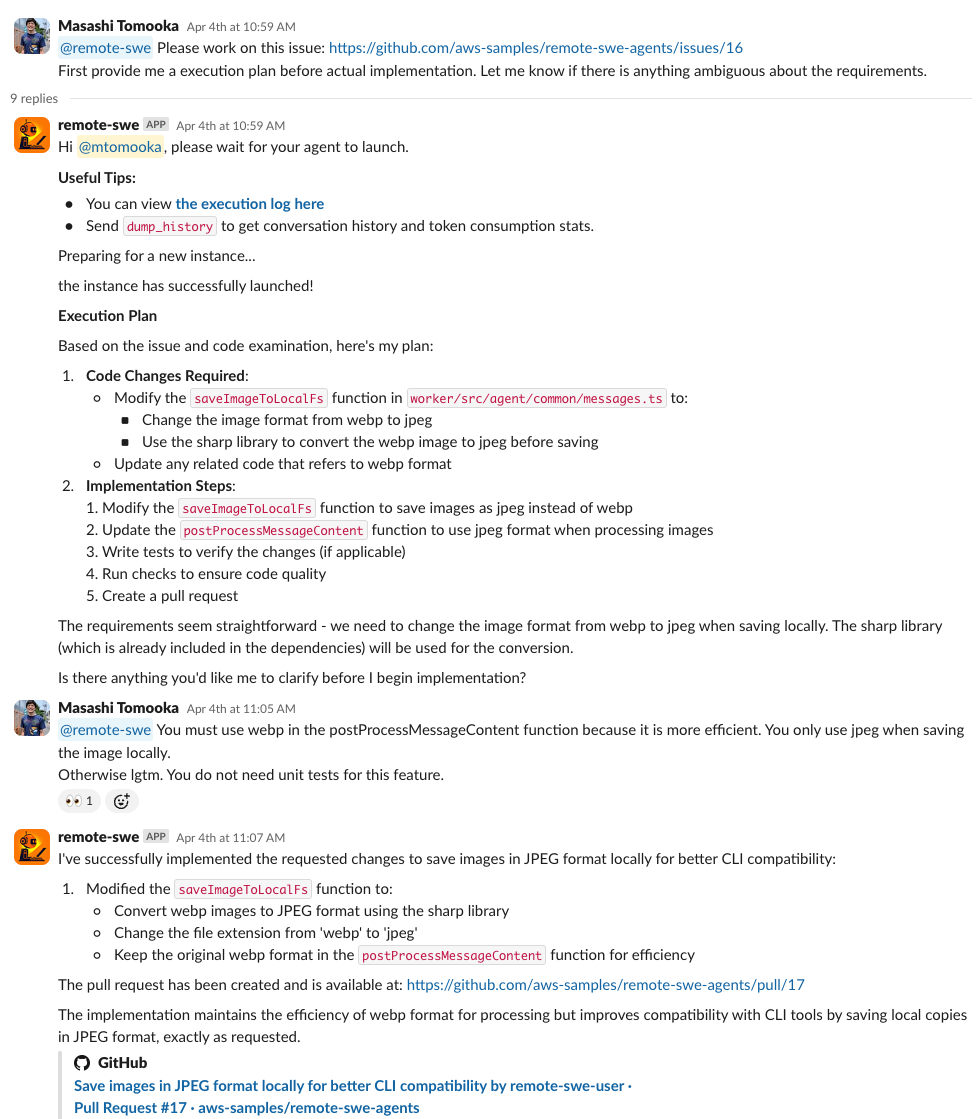
This is an example implementation of a fully autonomous software development AI agent. The agent works in its own dedicated development environment, freeing you from being tied to your laptop!
TL;DR: This is a self-hosted, fully open-source solution on AWS that offers a similar experience to cloud-based asynchronous coding agents, such as Devin, OpenAI Codex, or Google Jules.
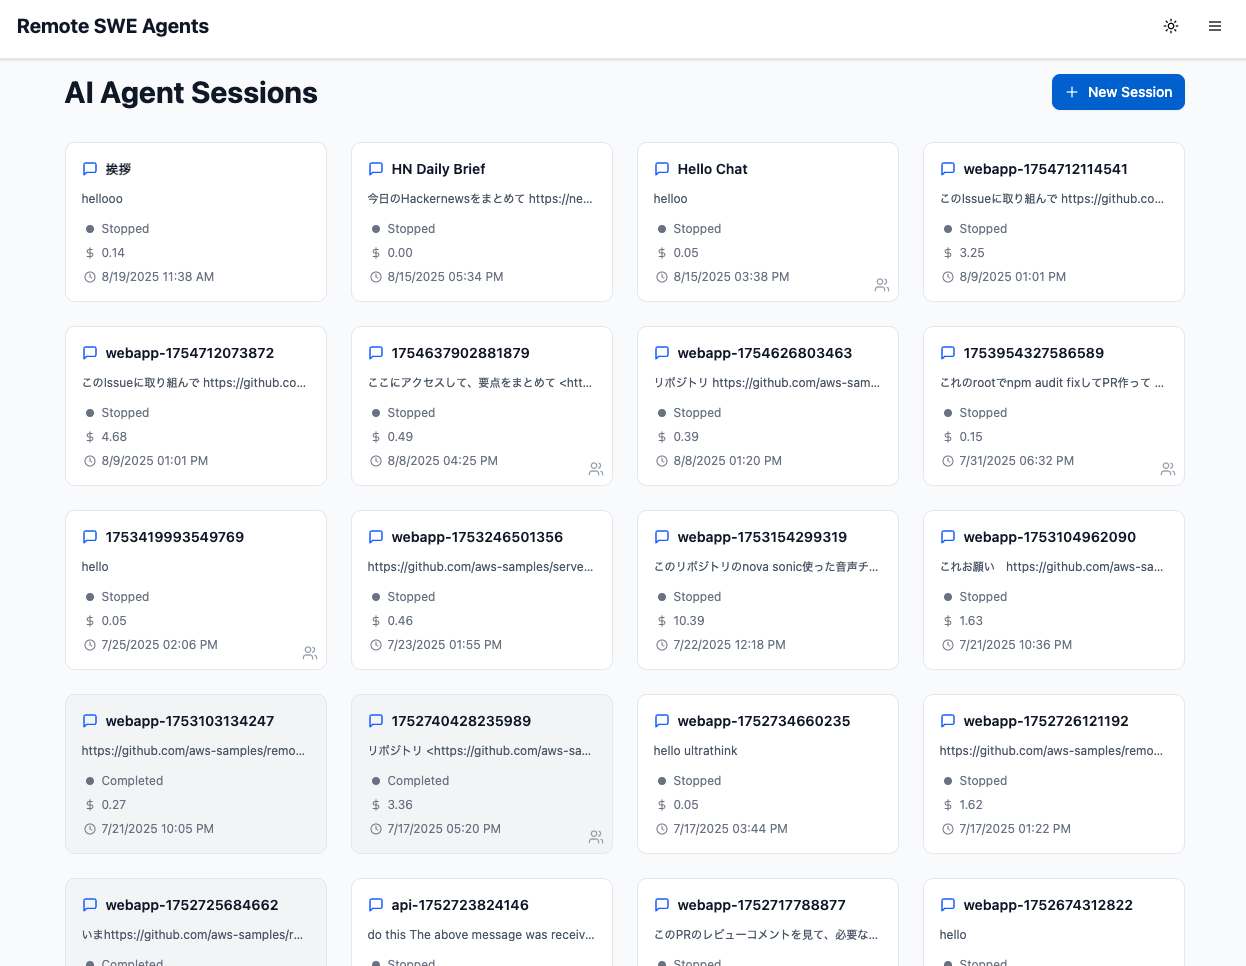
Some of the agent sessions by Remote SWE agents:
| Example 1 | Example 2 | Example 3 | Example 4 |
|---|---|---|---|
 | 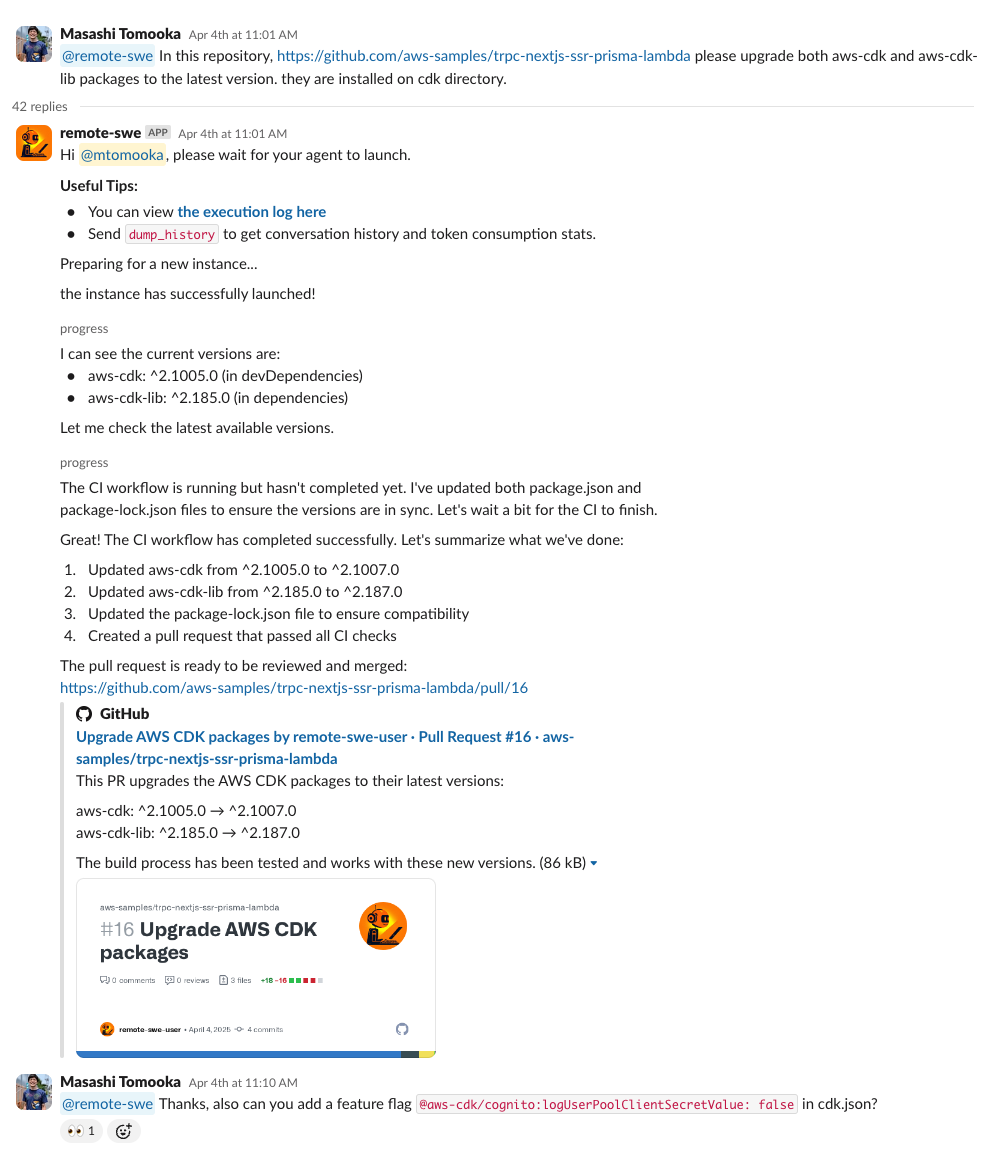 | 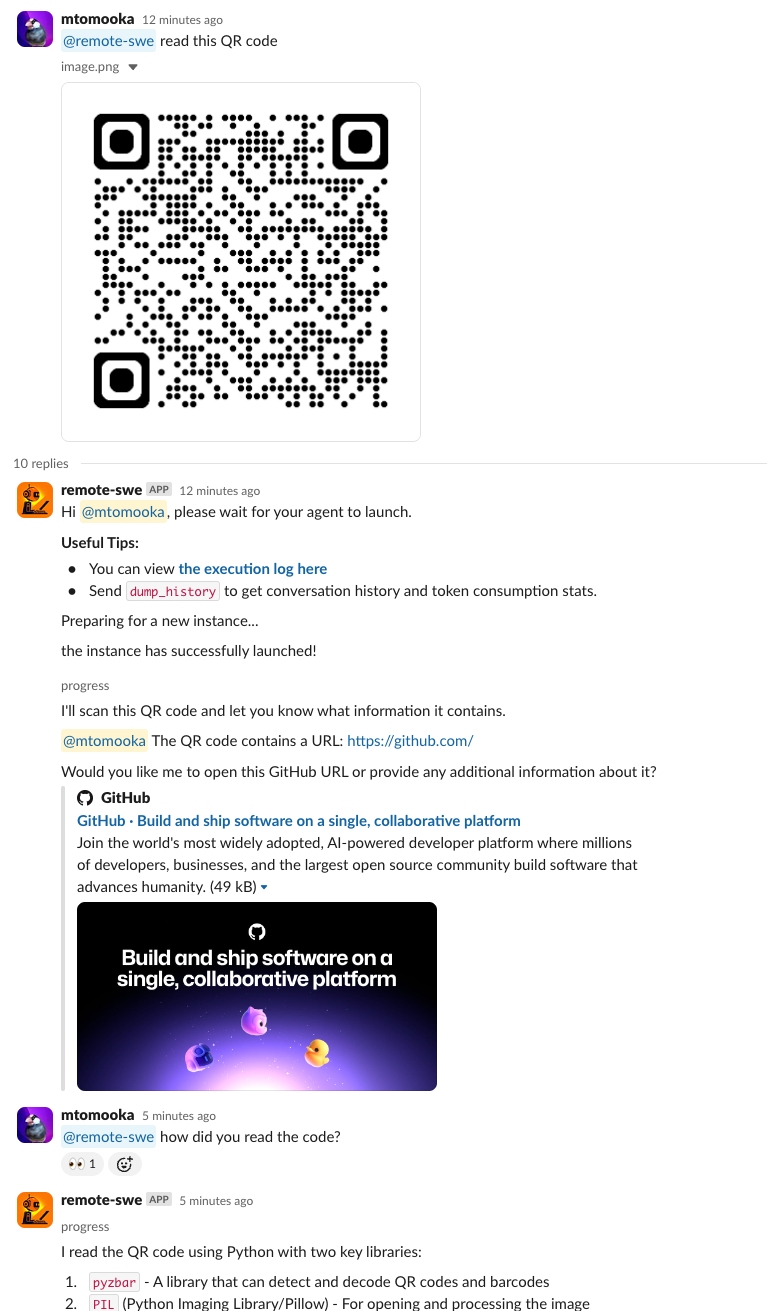 | 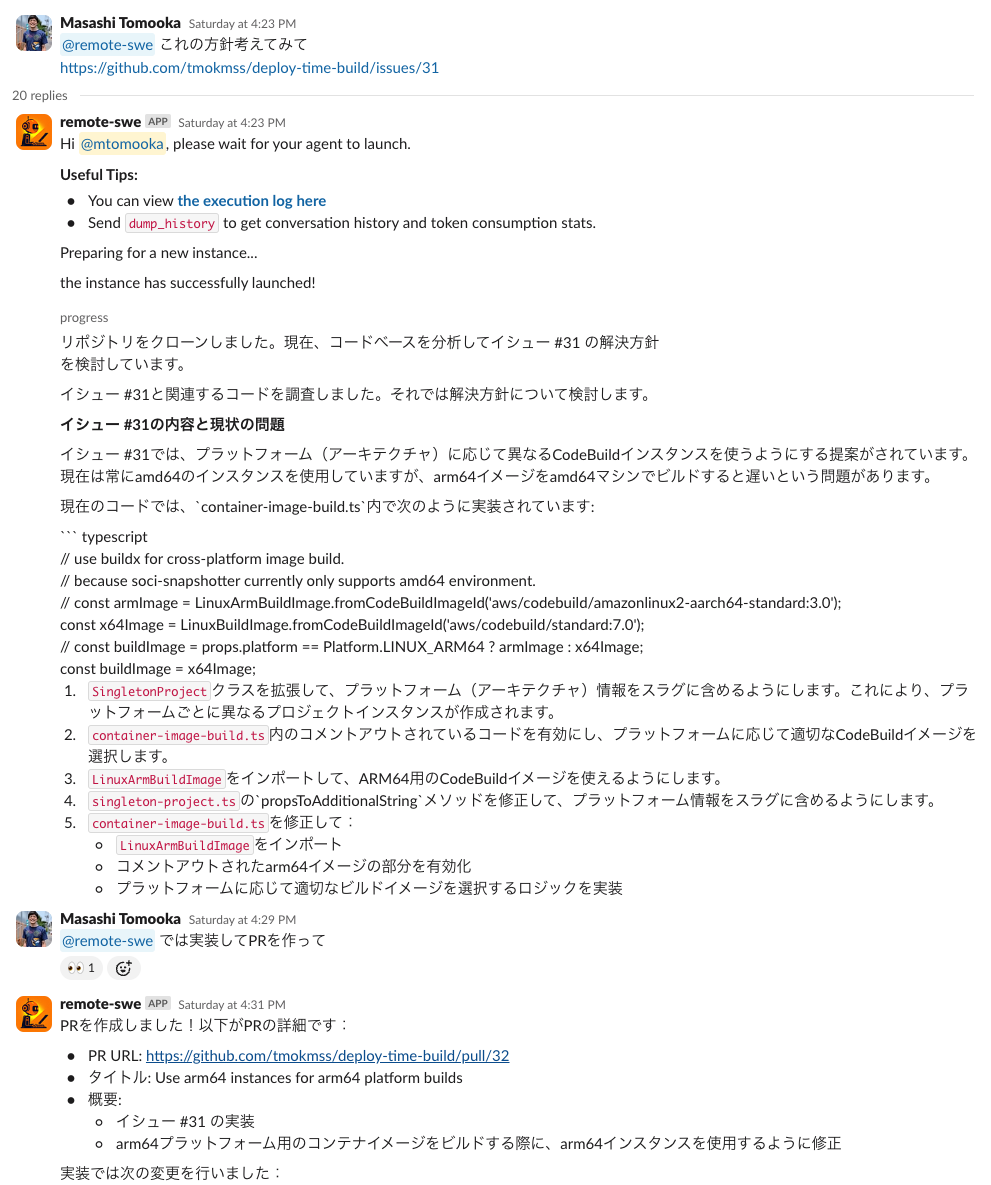 |
| Instruct via GitHub issue. Resulting PR | single instruction to multiple repos PR#1, PR#2, PR#3 | The agent can also input and output images as well. | The agent can speak other languages than English as well. Resulting PR |
You can view all the public pull requests created by the agent here. All of the commits pushed from the GitHub user is written by the agent autonomously.
For a simple deployment with minimal configuration, you can use our one-click deployment solution: AWS Sample One-Click Generative AI Solutions
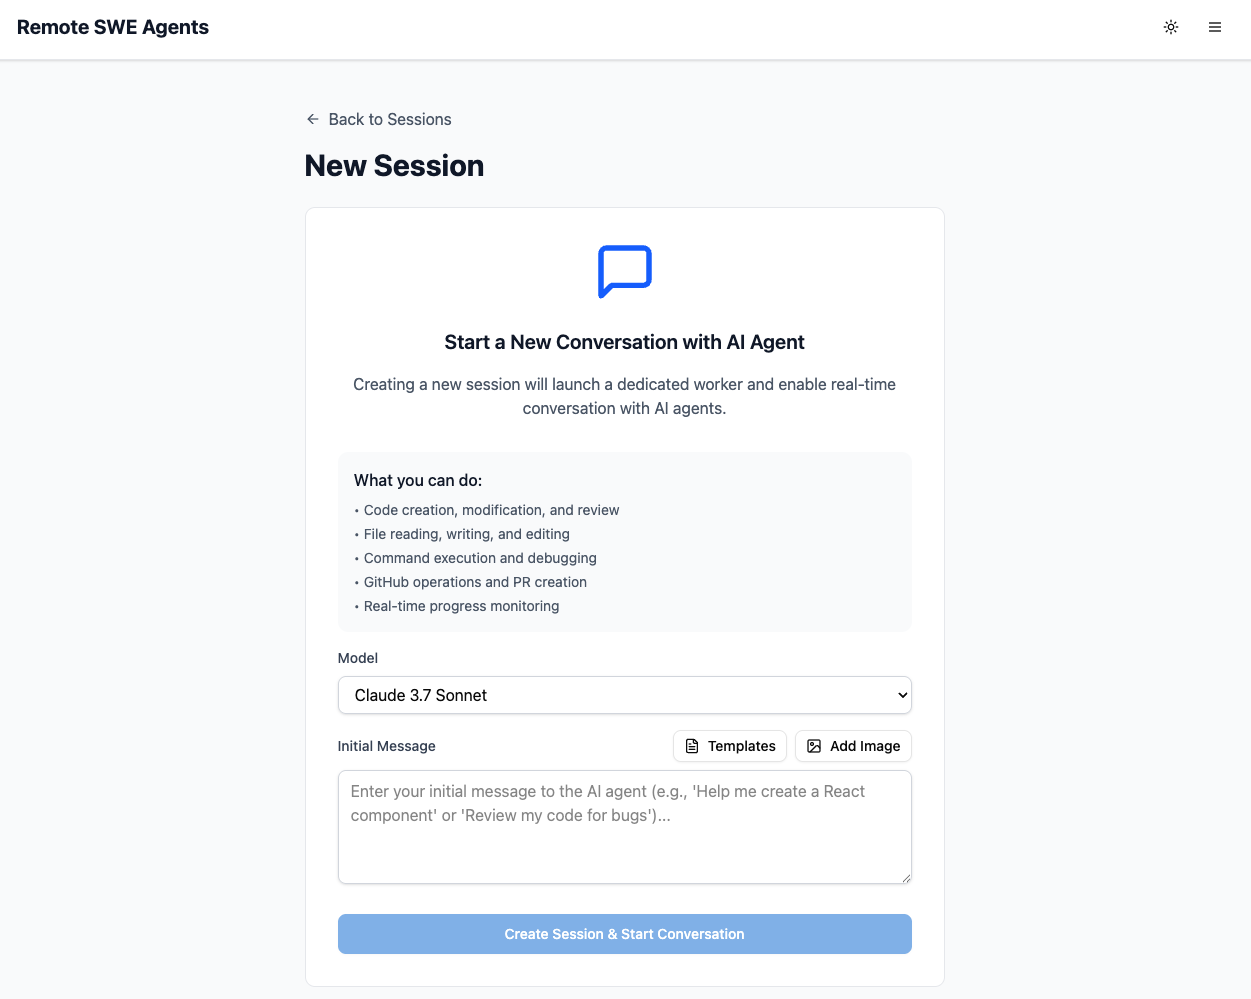
Get the system running with the web interface.
git clone https://github.com/aws-samples/remote-swe-agents.git
cd remote-swe-agents
Create a .env.local file from the example template in the cdk directory:
cd cdk
cp .env.local.example .env.local
[!IMPORTANT] The
.env.local.examplefile is located in thecdk/directory. Make sure to copy and edit this file before deployment.
Edit cdk/.env.local to configure the following optional settings:
You can automatically create an initial webapp user during deployment:
INITIAL_WEBAPP_USER_EMAIL=your-email@example.com
When set, a Cognito user will be created during deployment, and a temporary password will be sent to the specified email address.
If you don't set this variable, you can manually create users later through the AWS Cognito Management Console. See Creating a new user in the AWS Management Console.
You can configure additional managed policies to be attached to the worker instance role. You can set both AWS Managed policy name and a policy's full ARN:
WORKER_ADDITIONAL_POLICIES=AmazonS3ReadOnlyAccess,arn:aws:iam::123456789012:policy/CustomPolicy
If you want to use an existing VPC instead of creating a new one, specify the VPC ID:
VPC_ID=vpc-12345abcdef
Choose the cross-region inference profile region (default: us):
BEDROCK_CRI_REGION_OVERRIDE=global # Choose from: global, us, eu, apac, jp, au
[!NOTE] Some models (e.g. Opus 4.5) require the
globalprofile.
[!NOTE] We use environment variables here to inject configuration from GitHub Actions variables. If this isn't convenient for you, you can simply hard-code the values in
bin/cdk.ts.
cd cdk && npm ci
npx cdk bootstrap
npx cdk deploy --all
Deployment usually takes about 10 minutes.
That's it! After deployment, you can access the webapp via the WebappUrl shown in the CDK stack output. At this point, you can use the system through the web interface and API — agents can work on tasks, but won't have GitHub access until you configure it in the next step.
To allow agents to interact with GitHub repositories (clone, create PRs, etc.), configure one of the following options.
Which option should you choose?
repo, workflow, read:org$TARGET_ENV matches your deployment environment, e.g. Sandbox):
aws ssm put-parameter \
   --name /remote-swe/$TARGET_ENV/github/personal-access-token \
   --value "your-access-token" \
   --type String
cdk/bin/cdk.ts to include GitHub configuration in your stack props:
github: {
  personalAccessTokenParameterName: `/remote-swe/${targetEnv}/github/personal-access-token`,
},
[!NOTE] If you want to share the system with multiple developers, it is recommended to create a machine user account for GitHub instead of using your own account's PAT, to prevent misuse of personal privileges.
$TARGET_ENV matches your deployment environment):
aws ssm put-parameter \
   --name /remote-swe/$TARGET_ENV/github/app-private-key \
   --value "$(cat your-private-key.pem)" \
   --type String
https://github.com/organizations/<YOUR_ORG>/settings/installations/<INSTALLATION_ID>)cdk/.env.local:
GITHUB_APP_ID=your-github-app-id
GITHUB_INSTALLATION_ID=your-github-installation-id
cdk/bin/cdk.ts to include GitHub configuration in your stack props:
github: {
  privateKeyParameterName: `/remote-swe/${targetEnv}/github/app-private-key`,
  appId: process.env.GITHUB_APP_ID!,
  installationId: process.env.GITHUB_INSTALLATION_ID!,
},
[!NOTE] Currently when using with GitHub App, you can only use repositories under a single organization (i.e. app installation).
After configuring GitHub integration, re-deploy:
cd cdk && npx cdk deploy --all
Enable Slack bot functionality so you can interact with agents directly from Slack.
https://redacted.execute-api.us-east-1.amazonaws.com) with your actual URLSlackBoltEndpointUrl after deploying with Slack enabledPlease also refer to this document for more details: Create and configure apps with manifests
Register the Slack secrets in your AWS account ($TARGET_ENV matches your deployment environment):
aws ssm put-parameter \
    --name /remote-swe/$TARGET_ENV/slack/bot-token \
    --value "your-slack-bot-token" \
    --type String

aws ssm put-parameter \
    --name /remote-swe/$TARGET_ENV/slack/signing-secret \
    --value "your-slack-signing-secret" \
    --type String
Update cdk/bin/cdk.ts to include Slack configuration in your stack props:
slack: {
  botTokenParameterName: `/remote-swe/${targetEnv}/slack/bot-token`,
  signingSecretParameterName: `/remote-swe/${targetEnv}/slack/signing-secret`,
},
To control which members in the Slack workspace can access the agents, you can provide a comma-separated list of Slack User IDs in cdk/.env.local:
SLACK_ADMIN_USER_ID_LIST=U123ABC456,U789XYZ012
[!NOTE] If you're using a shared (rather than personal) Slack workspace, it is recommended to set
SLACK_ADMIN_USER_ID_LISTto control agent access. Without this restriction, anyone in the workspace can access the agents and potentially your GitHub content.
[!NOTE] To grant a user access to the app after deployment, mention the app with an
approve_usermessage followed by mentions of the users, e.g.,@remote-swe approve_user @Alice @Bob @Carol
cd cdk && npx cdk deploy --all
Done! You now have Slack bot functionality in addition to the web interface.
After successful deployment, you can access the Remote SWE Agents system through:
Web Interface: Visit the webapp URL from your CDK Stack outputs (look for WebappUrl in the deployment output)
Slack Interface (if configured): Simply mention the Slack app and start assigning tasks to the agents
API Access: Use the RESTful API endpoints for programmatic integration
GitHub Actions Integration (if GitHub is configured): Integrate with your repositories using GitHub Actions
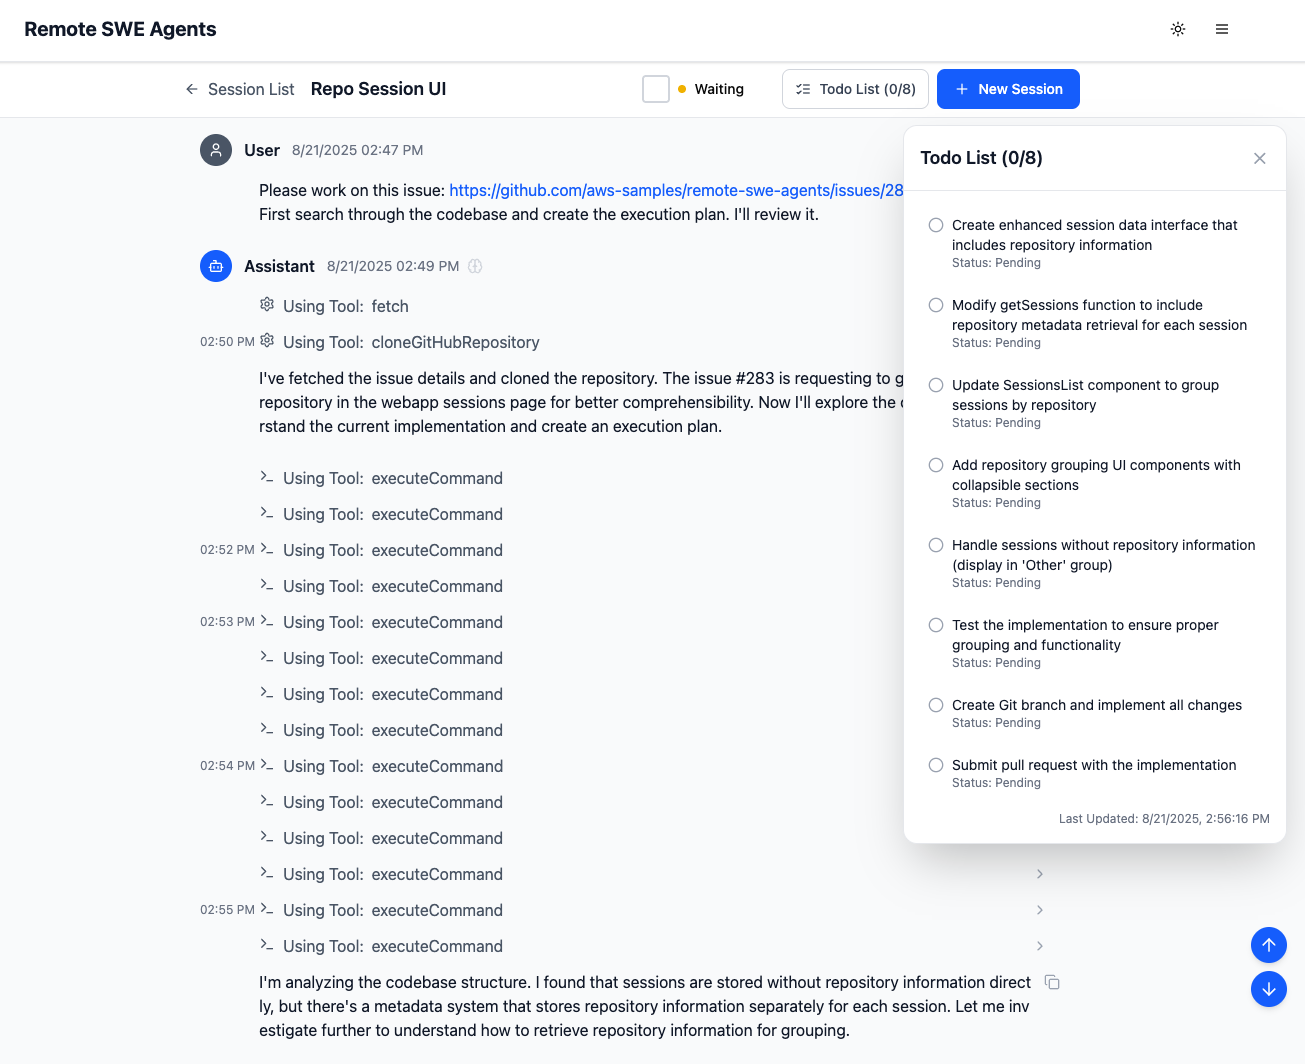
For tips on how to effectively use the agents, refer to the Useful Tips section.
This repository can be used as a GitHub Action to automatically trigger Remote SWE agents from GitHub events like issue comments, assignments, and PR reviews. The GitHub Action uses the Remote SWE API functionality to create and manage agent sessions.
Use aws-samples/remote-swe-agents in your workflow and configure your API base URL and key as repository secrets. You can generate API keys from the deployed webapp interface. See action.yml for input parameters and .github/workflows/remote-swe.yml for a complete example workflow.
This project is currently designed as a single-tenant system, meaning it is intended to be deployed on a per-tenant basis.
Since it follows a completely pay-as-you-go model, the overhead of deploying multiple instances is minimal in terms of infrastructure costs.
To control access for each tenant, you have the following access permission configurations:
SLACK_ADMIN_USER_ID_LIST environment variable in CDK to deny access from non-permitted users. You can then add allowed users using the approve_user Slack command.When you start an agent, your instruction should include at least the below content:
To simplify the workflow, you can create a GitHub issue in the repository containing the information above, and just give the agent its URL. This way the repository is automatically inferred from the URL, and it can also link the new PR to the corresponding issue.
You can configure global settings for all agents through the deployed web UI. These settings apply to agents started from both the web interface and Slack:
Default Foundation Model: Set the default foundation model that all new agent sessions will use. See models.ts for the latest supported models.
Common Agent Prompt: Configure a shared system prompt that will be used by all agents. This is useful for setting organization-wide coding standards, preferred libraries, or specific instructions that should apply to all development tasks.
To access these settings, navigate to the preferences page in your deployed webapp interface.
As our agent can work as an MCP client, you can easily integrate it with various MCP servers. To configure the integration, you can edit mcp.json and run CDK deploy. For example,
  "mcpServers": {
    "awslabs.cdk-mcp-server": {
      "command": "uvx",
      "args": ["awslabs.cdk-mcp-server@latest"],
      "env": {
        "FASTMCP_LOG_LEVEL": "ERROR"
      }
    }
  }
All the new agents can now use MCP servers as their tools.
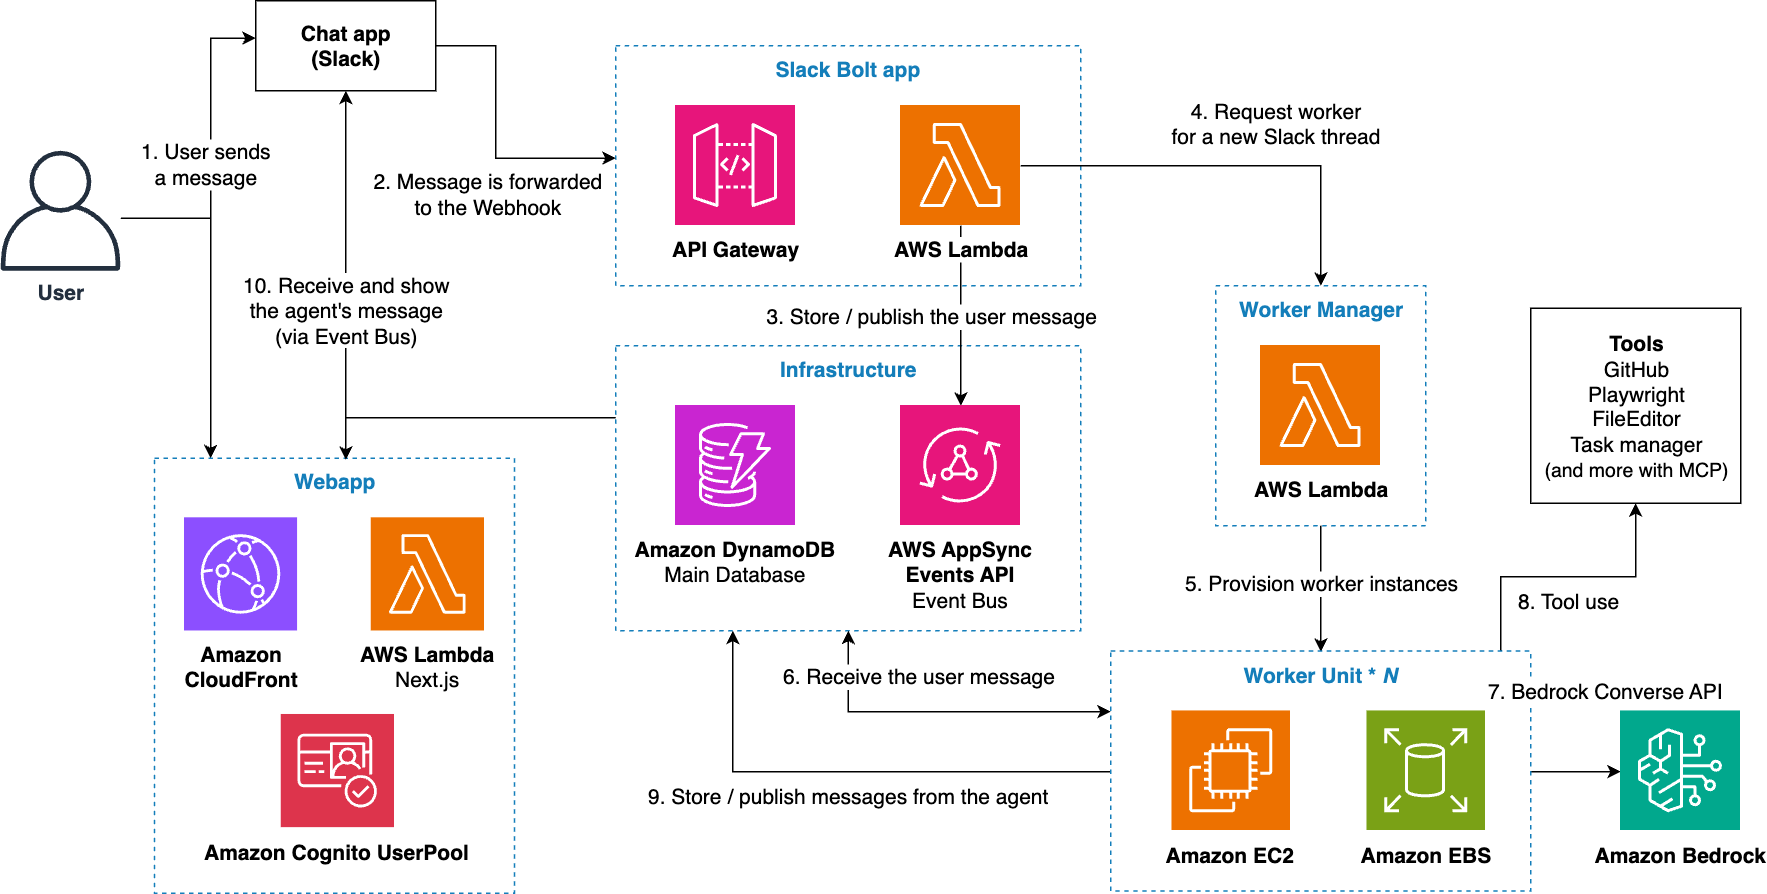
This system utilizes a Slack Bolt application to manage user interactions and implement a scalable worker system. Here's the main workflow:
Message Reception and Processing
Event Management and Message Distribution
Worker System Management
Feedback Loop
This architecture enables a scalable and reliable messaging processing system. The combination of serverless components (Lambda, API Gateway) and dedicated EC2 instances per worker ensures resource isolation and flexible scalability.
AI agents provide powerful capabilities but also introduce potential security risks. Here are recommended practices to mitigate these risks:
Isolation of Execution Environment
Principle of Least Privilege
WORKER_ADDITIONAL_POLICIES environment variable, carefully evaluate the risks associated with potential agent misbehaviorToken Security Management
Network Access Controls
curl or the fetch utilityVPC_ID environment variable to import existing VPCs with appropriate security controlsBy implementing these security practices, you can significantly reduce risks while leveraging the benefits of autonomous AI agents.
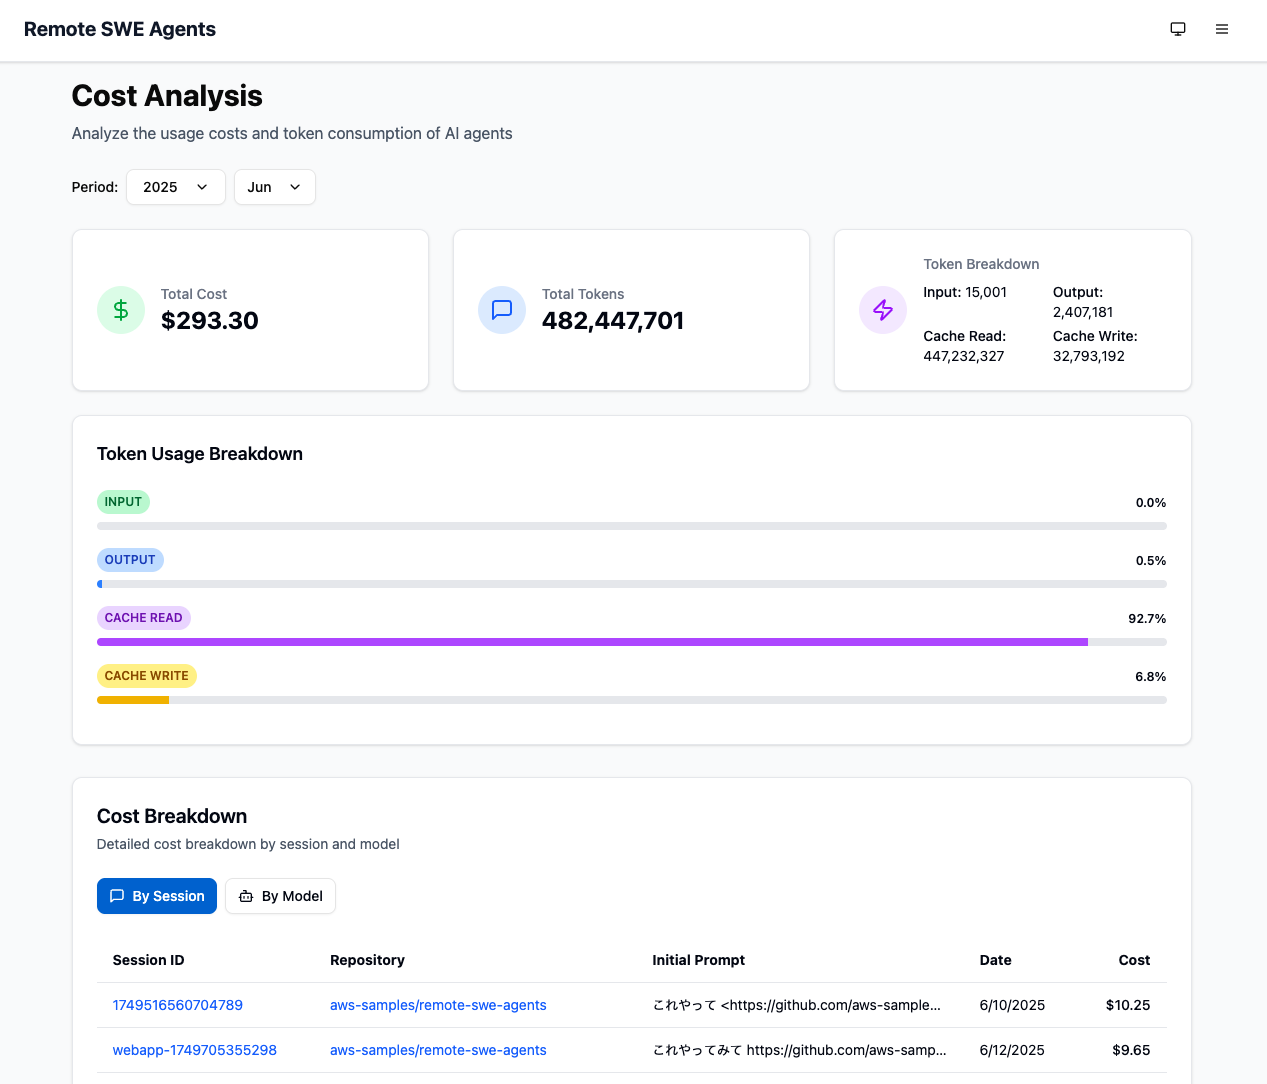
The following table provides a sample cost breakdown for deploying this system in the us-east-1 (N. Virginia) region for one month.
Here we assume you request 100 sessions per month. The monthly cost is proportional to the number of sessions. (e.g. If you only run 20 session/month, multiply it with 20/100.)
| AWS service | Dimensions | Cost [USD/month] |
|---|---|---|
| EC2 | t3.large, 1 hour/session | 8.32 |
| EBS | 30 GB/instance, 1 day/instance | 8.00 |
| DynamoDB | Read: 1000 RRU/session | 0.0125 |
| DynamoDB | Write: 200 WRU/session | 0.0125 |
| DynamoDB | Storage: 2 MB/session | 0.05 |
| AppSync Events | Requests: 20 events/session | 0.002 |
| AppSync Events | Connection: 1 hour/session | 0.00048 |
| Lambda | Requests: 30 invocations/session | 0.0006 |
| Lambda | Duration: 128MB, 1s/invocation | 0.00017 |
| API Gateway | Requests: 20 requests/session | 0.002 |
| Bedrock | Input (cache write): Sonnet 3.7 100k tokens/session | 37.5 |
| Bedrock | Input (cache read): Sonnet 3.7 1M tokens/session | 30.00 |
| Bedrock | Output: Sonnet 3.7 20k tokens/session | 30.00 |
| TOTAL | 115 |
Additionally, when the system is not in use (i.e., no messages are sent to the agents), the ongoing costs are minimal (~0 USD).
You can clean up all the resources you created by the following commands:
npx cdk destroy --force
[!NOTE]
When executingcdk deploy, an EC2 Image Builder pipeline is launched asynchronously. Please wait at least 30 minutes after deployment before destroying the stack. If stack deletion fails, wait about 30 minutes and trycdk destroyagain.
See CONTRIBUTING for more information.
This library is licensed under the MIT-0 License. See the LICENSE file.
Run analytics queries on ClickHouse — explore schemas, execute SQL, fetch results
Run Claude Code as an MCP server so any agent can delegate coding tasks to it
Browser automation using accessibility snapshots instead of screenshots
Google's universal MCP server supporting PostgreSQL, MySQL, MongoDB, Redis, and 10+ databases